ActiveGate plugins hands-on
Let’s learn by example. In this tutorial, we’ll walk you through the creation of a basic ActiveGate plugin. Your ActiveGate plugin will be executed on an ActiveGate and will enable monitoring of the demo application bundled with the ActiveGate Plugin SDK.
Prepare your enviroment
- Check prerequisites:
- DESK version 1.176 or newer
- Environment ActiveGate v1.175 or newer
- monitoring admin access
- Install Python 3.6.6. ActiveGate is bundled with Python 3.6.6 and we recommend to use Plugin SDK with same Python version.
- Install Environment ActiveGate. Version 1.175+ has the plugin module installed by default.
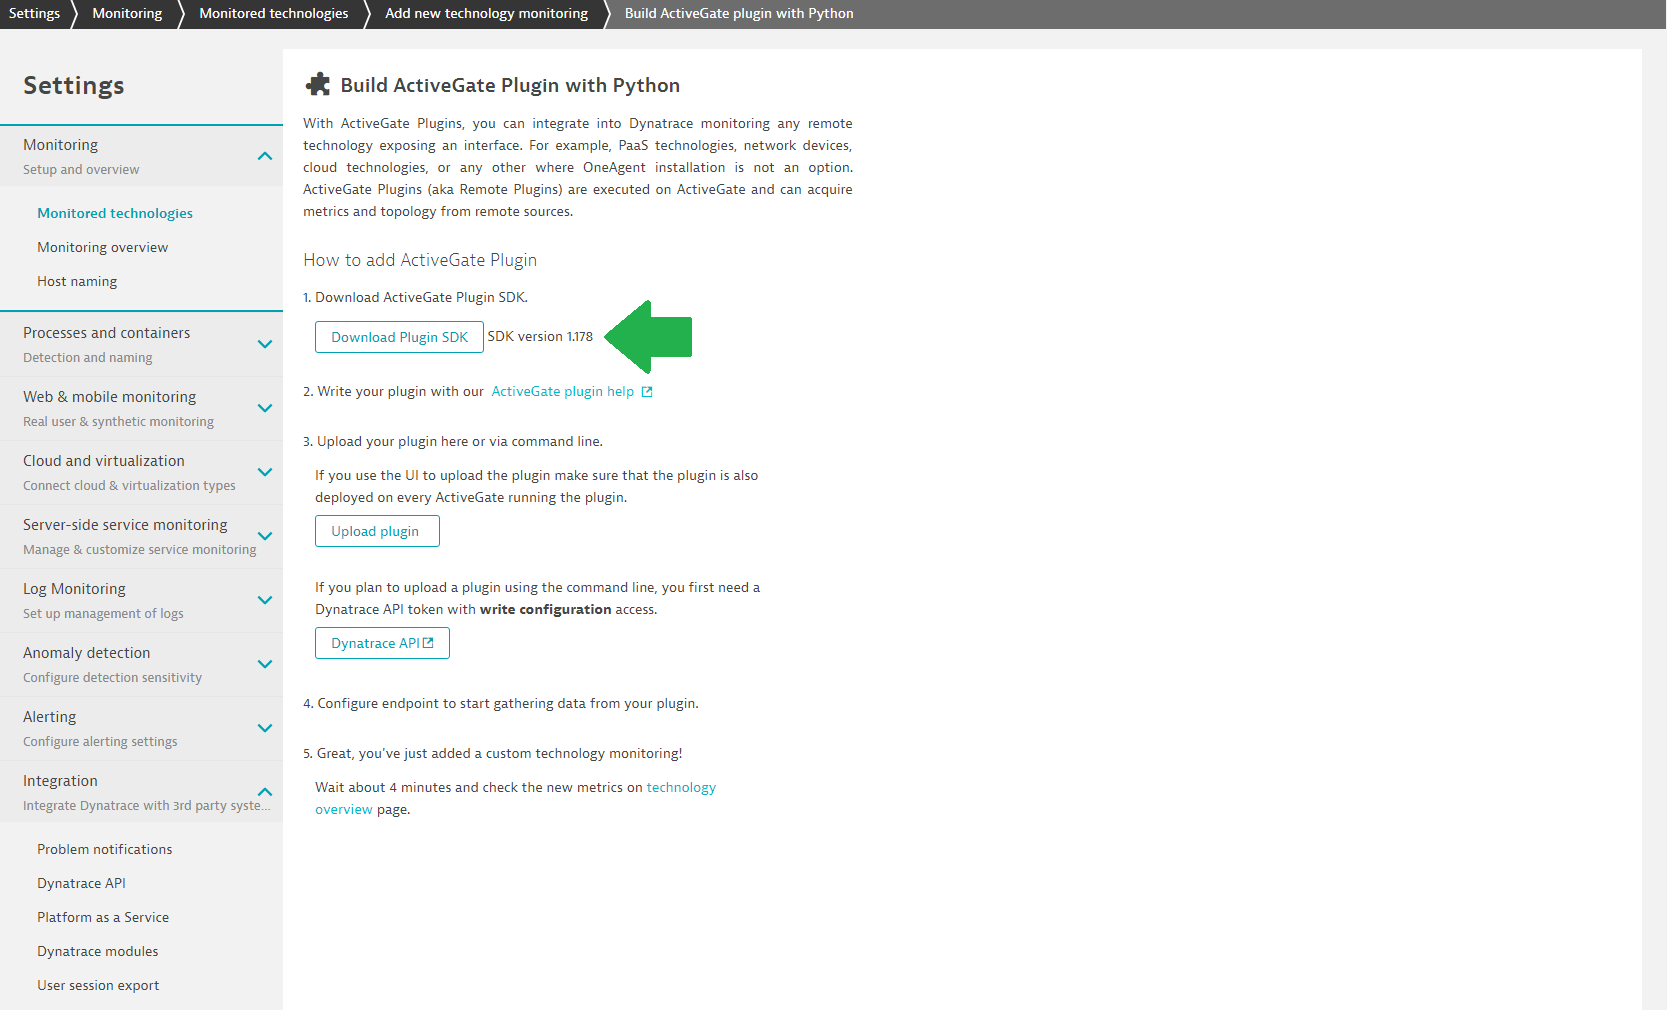
Download ActiveGate Plugin SDK.
- Sign in to DESK, navigate to Settings > Monitored technologies > Add new technology monitoring > Add ActiveGate plugin and click Download Plugin SDK.
- Extract the archive to a convenient directory. It contains docs, examples and the Plugin SDK
whlfile you'll use to install the SDK. - You'll find example plugins in the
examplesdirectory. In this article, we'll use theCustomCloudTechnologyplugin located in thedemo_activegate_plugin_multidirectory.
Install ActiveGate Plugin SDK
We recommend that you install the Plugin SDK using Python Virtual Environment. For guidance, see Virtual Environments and Packages in Python documentation.
- Navigate to the extracted directory with the
whlfile in it and run the following command:
pip3 install plugin_sdk-[sdk version number]-py3-none-any.whl
for example
pip3 install plugin_sdk-1.156.0.20181003.61122-py3-none-any.whl - Run the
plugin_sdk --helpto verify the Plugin SDK installation. For more information see Install Plugin SDK.
Deploy plugin
Things to remember
- You must upload the plugin to both, the DESK Server and ActiveGate that will execute it. If you installed the Plugin SDK on the ActiveGate host, the
build_plugincommand takes care of both, the Server and ActiveGate. If you installed your Plugin SDK on a separate host, which is a more common case, upload your plugin to the ActiveGate manually. During the development stage, we recommend to install Plugin SDK on the ActiveGate to make your development process easier. - The
build_plugincommand builds the plugin package and uploads it to a selected deployment directory. You'll need the DESK Server URL and token to run the command. If you installed the Plugin SDK on the ActiveGate host, the SDK will automatically retrieve the server URL from the ActiveGate configuration. Get the Token from Settings > Monitored technologies > Custom plugins and save it as theplugin_upload.tokenfile in the ActiveGate plugin module config directory. By default%PROGRAMFILES%\DESK\remotepluginmodule\agent\confon Windows and/opt/DESK/remotepluginmodule/agent/confon Linux. - You can't deploy the same plugin version twice. To upload a modified plugin, make sure you increment the plugin version with every build or upload. Use the
versionproperty in the metadata section of your JSON definition.
Deploy your plugin!
Navigate to the plugin SDK \examples\demo_activegate_plugin directory and run the plugin_sdk build_plugin command. It will build the plugin package from the current directory. When completed, copy the plugin package to the ActiveGate deployment directory (%PROGRAMFILES%\DESK\remotepluginmodule\plugin_deployment or /opt/DESK/remotepluginmodule/plugin_deployment and upload the plugin to the DESK server your ActiveGate is assigned to. A message similar to this means everything went well.
Copying plugin to target_directory: {plugin_deployment_dir}\custom.remote.python.example_multi
Creating plugin archive
========================================
Plugin deployed successfully into {plugin_deployment_dir}\custom.remote.python.example_multi
Plugin archive available at {plugin_deployment_dir}\custom.remote.python.example_multi.zip
========================================
interactive upload -> oneagent_upload_plugin -p {plugin_deployment_dir}\custom.remote.python.example_multi.zip -s https://{DESK_server_URL}:443/api/v1/remoteplugins -t #####################
Attempting to send plugin to server https://{DESK_server_URL}:443/api/v1/remoteplugins
plugin has been uploaded successfully
Congratulations you have successfully deployed your first ActiveGate plugin.
Start the demo app
Your first ActiveGate plugin will monitor the demo app bundled with the SDK. The demo app simulates the EXAMPLE_SERVICE technology that runs on a cluster (device group) with two nodes (devices). The demo app API provides access to metrics. Your plugin will import the topology and fetch the metrics.
- Start the demo app. Navigate to the directory where you extracted the SDK and run the following command:
python -m plugin_sdk.demo_app - Verift if your app is up and running. Go to http://127.0.0.1:8769/ and check the app response.
Set up the plugin
- Navigate to Settings > Monitored technologies > Custom plugins tab
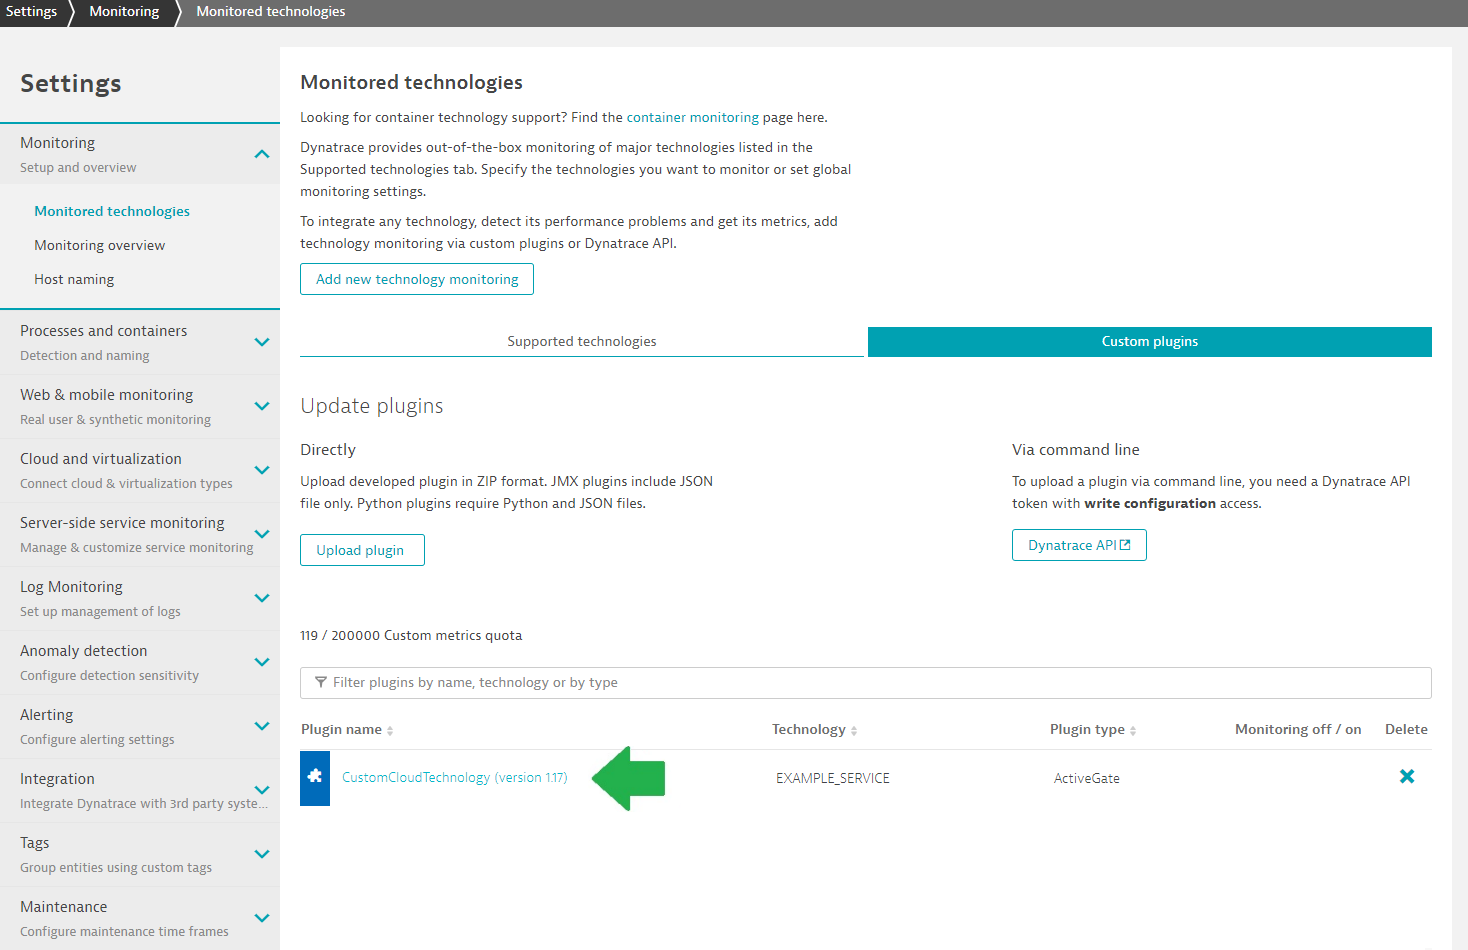
- Open CustomCloudTechnology plugin and configure the plugin

- Verify the successful plugin start. The Demo Plugin should display the Ok status.
- Wait patiently. It takes up to 2 minutes for the first data to be collected.
Look around
- Navigate to Technologies and find
EXAMPLE_SERVICEtile.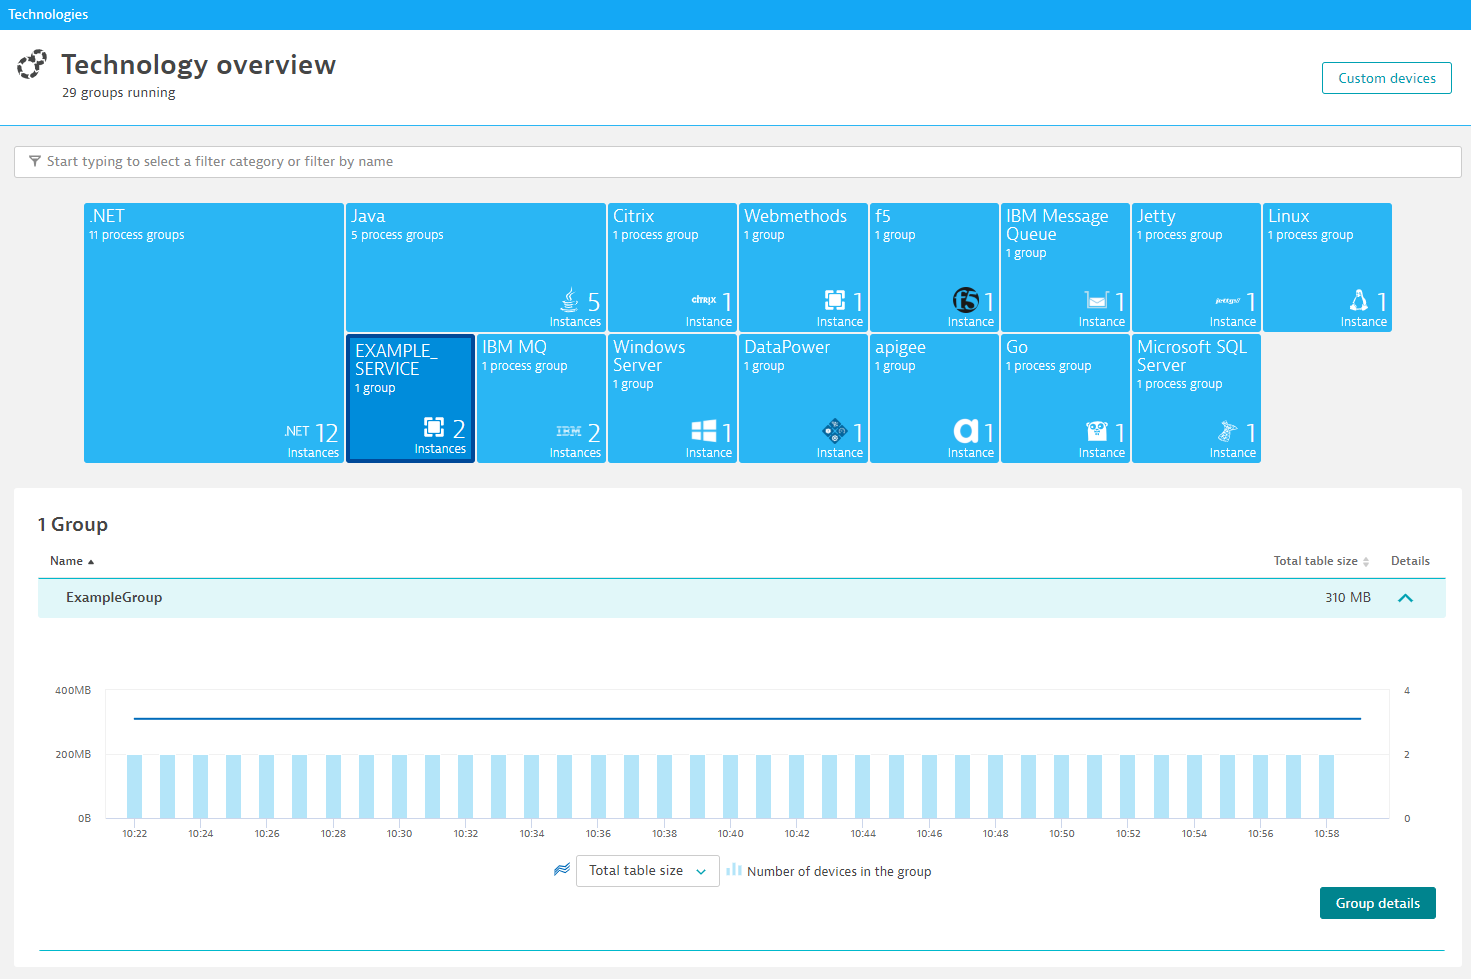
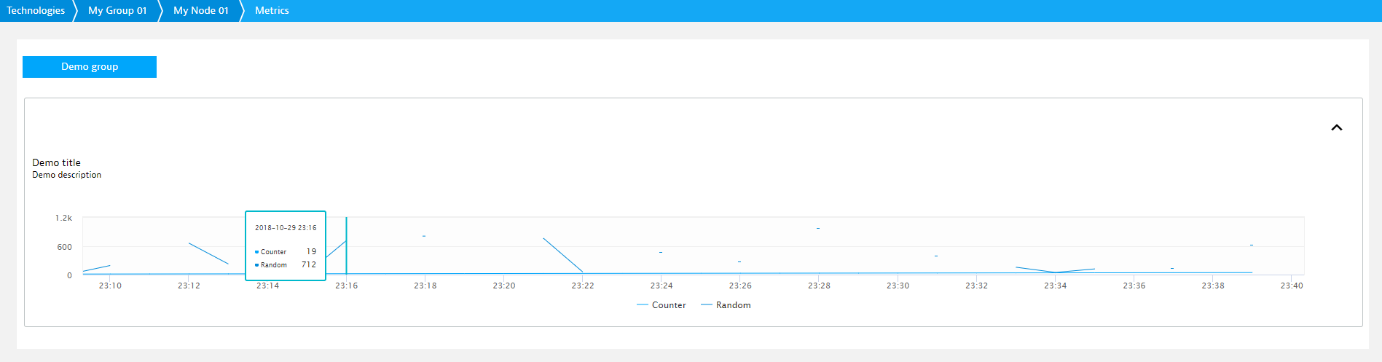
- The Group page lets you analyze the group and compare the performance of its members.
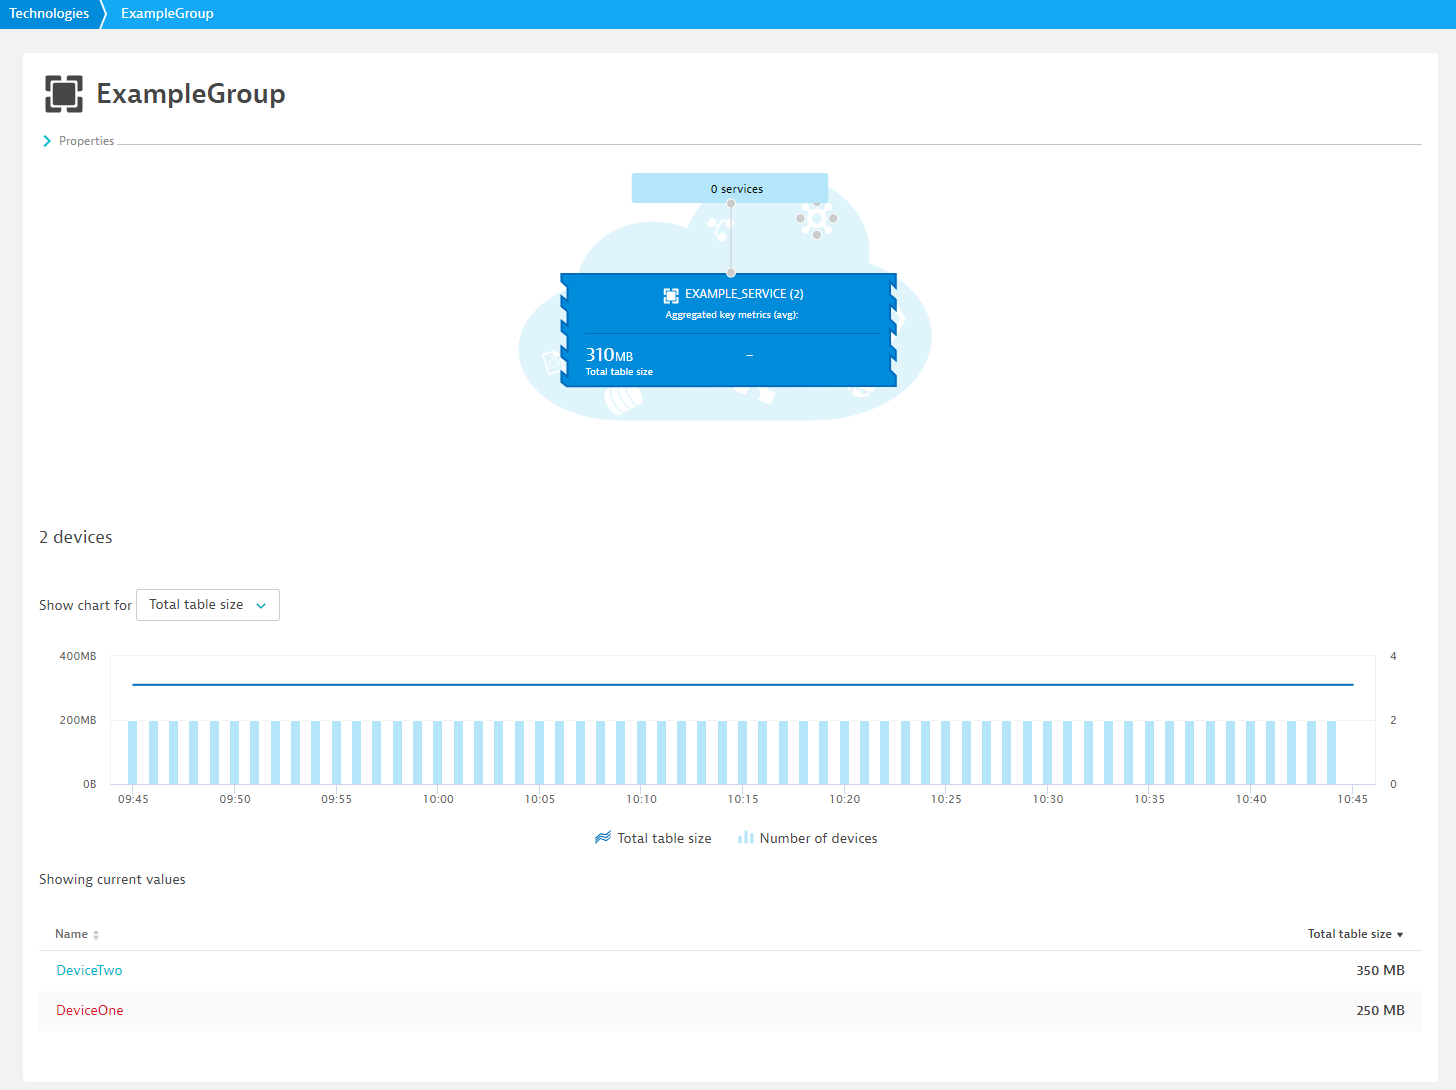
- Analyze varius chart types on device page
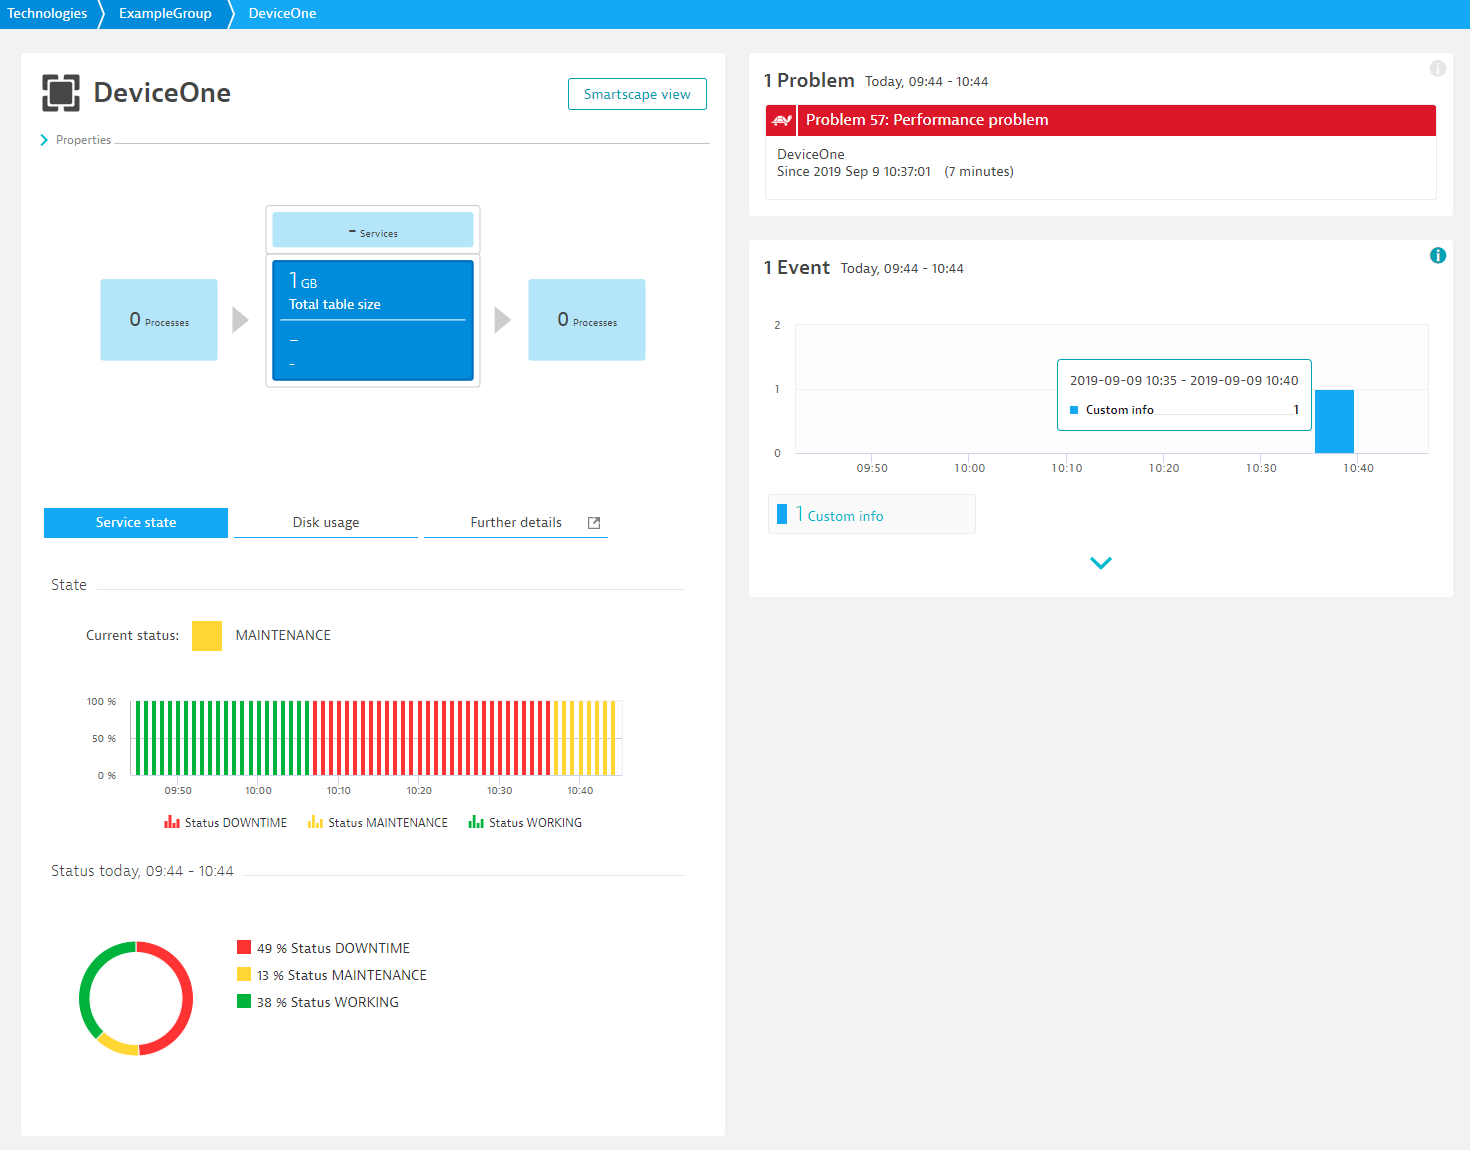
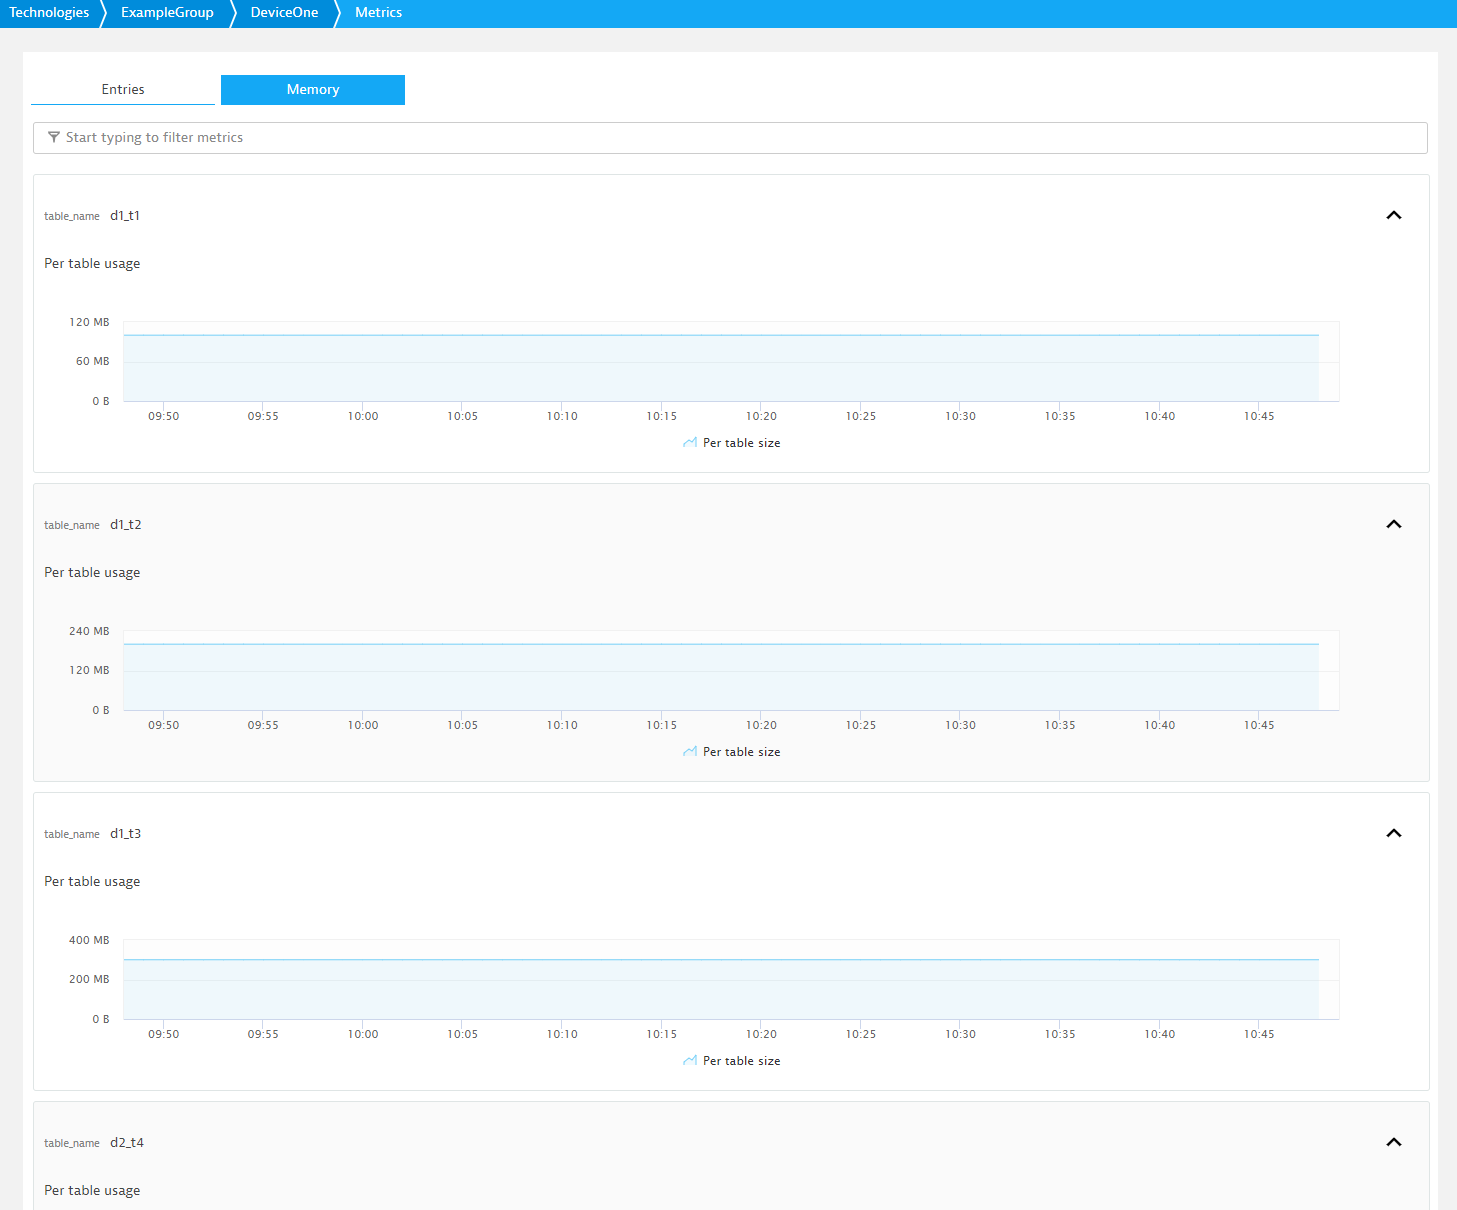
- Navigate to futher details to find memory tab
Customize the plugin
The ActiveGate plugin consist of the two key files, Python and JSON. The JSON file defines the presentation of your data on various DESK pages. With the Python file, you can define additional events and create custom properties. See ActiveGate plugins reference and ActiveGate plugins capabilities. Try to play with the files and see how the data presentation is affected.
JSON
The plugin JSON file consists of the following 4 main elements:
This part of the JSON file defines how metrics are charted. The key metrics section allows you to select the most important metrics and present them in the infographic and the group page. You'll find charts in the further details tab.
Python
The Python code is stored in the demo_activegate_plugin_multi.py file.
Demo Python code
from ruxit.api.base_plugin import RemoteBasePlugin
from ruxit.api.data import PluginProperty
import math
import logging
from enum import Enum

logger = logging.getLogger(__name__)

class RemoteExamplePlugin(RemoteBasePlugin):

    class State(Enum):
        DOWNTIME = 0
        MAINTENANCE = 1
        WORKING = 2

    def initialize(self, **kwargs):
        self.url = self.config.get("url", "http://127.0.0.1:8976")
        self.user = self.config.get("auth_user", "admin")
        self.password = self.config.get("auth_password", "admin")
        self.alert_interval = self.config.get("alert_interval", 10)
        self.event_interval = self.config.get("event_interval", 3)
        self.relative_interval = self.config.get("relative_interval", 60)
        self.state_interval = self.config.get("state_interval", 60)

        self.alert_iterations = 0
        self.event_iterations = 0
        self.relative_iterations = 0
        self.absolute_iterations = 0
        self.state_iterations = 0

        self.current_entries = 1
        self.archived_entries = 0

    def query(self, **kwargs):
        group_name = self.get_group_name()
        topology_group = self.topology_builder.create_group(group_name, group_name)
        topology_group.per_second("service.querries_per_second", self.get_num_querries())
        topology_group.report_property(key="group_property", value="group_property_value")
        devices = self.get_device_names()
        port = 80
        for device_name in devices:
            topology_device = topology_group.create_device(device_name, device_name)
            topology_device.state_metric("service.state_5", self.get_state_metric())
            topology_device.absolute("databases.total_num_entities", self.get_device_entries())
            table_size = 100
            topology_device.relative("databases.replicated_entries", self.get_archived_entries())
            for table in self.get_tables_for_device(device_name):
                topology_device.absolute("databases.table_size", table_size, {"table_name": table})
                table_size = table_size + 100
            if self.should_create_event():
                topology_device.report_custom_info_event("Custom event!")
                topology_device.report_performance_event("Performance problem description", "Performance problem", {})
            topology_device.report_property(key="device_property", value="device_property_value")
            topology_device.add_endpoint("127.0.0.1", port)
            port += 1


    def get_group_name(self):
        return "ExampleGroup"

    def get_state_metric(self):
        if self.state_iterations >= self.state_interval * 3:
            self.state_iterations = 0
        state = RemoteExamplePlugin.State(int(self.state_iterations / self.state_interval))
        self.state_iterations = self.state_iterations + 1
        return state.name

    def get_num_querries(self):
        self.alert_iterations = self.alert_iterations + 1
        if self.alert_iterations > self.alert_interval:
            if self.alert_iterations > self.alert_interval + 3:
                self.alert_iterations = 0
            return 1
        return 7

    def get_device_names(self):
        return ["DeviceOne", "DeviceTwo"]

    def get_tables_for_device(self, device):
        if device == "DeviceOne":
            return ["d1_t1", "d1_t2", "d1_t3", "d2_t4"]
        return ["d2_t1", "d2_t2", "d2_t3", "d2_t4", "d2_t5", "d2_t6"]

    def get_device_entries(self):
        if self.absolute_iterations == 360:
            self.absolute_iterations = 0
        self.absolute_iterations = self.absolute_iterations + 1
        return self.current_entries + math.sin(math.radians(self.absolute_iterations))

    def get_archived_entries(self):
        self.relative_iterations = self.relative_iterations + 1
        if self.relative_iterations > self.relative_interval:
            self.relative_iterations = 0
            self.archived_entries = self.archived_entries + 1
        return self.archived_entries

    def should_create_event(self):
        self.event_iterations = self.event_iterations + 1
        if self.event_iterations > self.event_interval:
            self.event_iterations = 0
            return True
        return False
The file defines the RemoteExamplePlugin class, which in turn defines one method query. When your plugin runs, this method is called once each minute to collect and send topology data and metrics to DESK Server.
The demo app returns the JSON response as in the example below.
Demo app response
[
  {
    "nodes": [
      {
        "ip": "192.168.0.1",
        "stats": {
          "stats_counter": [
            6,
            10,
            13
          ],
          "random": 194,
          "state": "WARNING",
          "counter": 4,
          "version": "1.001"
        },
        "name": "My Node 01"
      },
      {
        "ip": "127.0.0.1",
        "stats": {
          "stats_counter": [
            7,
            10,
            11
          ],
          "random": 194,
          "state": "WARNING",
          "counter": 4,
          "version": "1.001"
        },
        "name": "My Node 02"
      }
    ],
    "name": "My Group 01"
  }
]
Plugin’s query method parses the response, finds groups, devices and assigns metrics accordingly. The plugin automatically detects and monitors new groups and devices.
Next steps
This is just a beginning. Check other example plugins delivered with the SDK, explore How-tos, and get to know other integration options. Your feedback matters. Post your questions and ideas for improvements on the DESK Answers forum.