Manage users and groups with SAML in DESK SaaS
DESK SaaS enables authentication through your organization's identity provider (IdP). If you want to use your organization's corporate credentials for authentication in DESK, you can set up SAML to delegate authentication to your IdP.
SAML 2.0 is used for authentication. Based on the domain part of your corporate email address, DESK can determine if SAML was configured for that domain and redirect to your company’s IdP for authentication.
IdP requirements
Your IdP needs to follow some basic SAML specification and security requirements to be compliant with DESK SSO:
- The entire SAML message must be signed (signing only SAML assertions is insufficient and will generate a
400 Bad Requestresponse) - The SAML protocol version is
urn:oasis:names:tc:SAML:2.0:protocol - The
NameIDformat isurn:oasis:names:tc:SAML:1.1:nameid-format:emailAddress - IdP response
NotBeforeandNotOnOrAfterassertion timestamps must consider system clock skew and must be set to at least 1 minute before and 1 minute after the current time (this particularly concerns AD FS default settings) - The IdP response status code must be
urn:oasis:names:tc:SAML:2.0:status:Success - The
SignatureMethodalgorithm ishttp://www.w3.org/2001/04/xmldsig-more#rsa-sha256 - The
DigestMethodalgorithm ishttp://www.w3.org/2001/04/xmlenc#sha256 - No assertion encryption
DESK SSO SP metadata is provided at https://sso.desk.com/sso/metadata. If your IdP requires manual configuration and you don't have any XML parser addons installed in your Chrome browser, we recommend that you view the metadata in Firefox.
Depending on the IdP type, these endpoints need to be configured as follows:
https://sso.desk.com:443/saml2/loginfor Entity ID / Audience Restrictionhttps://sso.desk.com:443/saml2/sp/consumerfor Single Sign On URL / Destination URL / Recipient URLhttps://sso.desk.com:443/saml2/sp/logoutfor Single Logout Service URL
If your IdP configuration screen contains the option to set SAML bindings for login or logout, set it to urn:oasis:names:tc:SAML:2.0:bindings:HTTP-POST.
SAML federated IdP configuration
To set up SAML for your domain
- Create a fallback user account
- Verify your ownership of the domain
- Configure metadata
- Test your configuration
1. Create a fallback user account
When a user signs in, DESK checks the domain part of your corporate email address to determine whether SAML was configured for that domain. If there is a match, the sign-in is redirected to your company’s IdP for authentication. For a fallback, you need an email address that will not be redirected like this.
You need to create a fallback user account so you don't get locked out if you have configuration troubles.
Your fallback account must be a non-federated user account that has the manage users and manage groups permissions and isn't covered by the federated login.
- Invite a user with a non-federated email address (an email address with a different domain than the one for which you are setting up SAML).
- Specify the manage users and manage groups permissions in the invitation (users can be invited via the User management page).
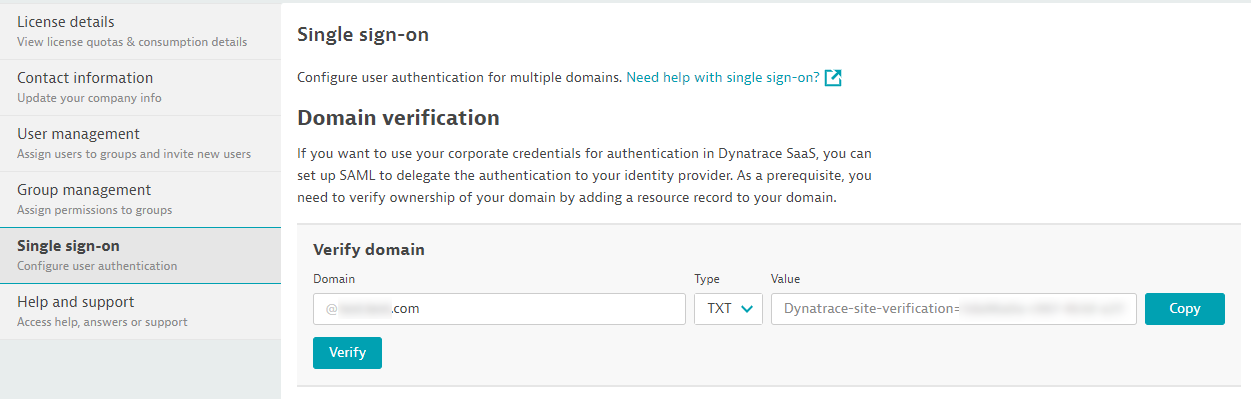
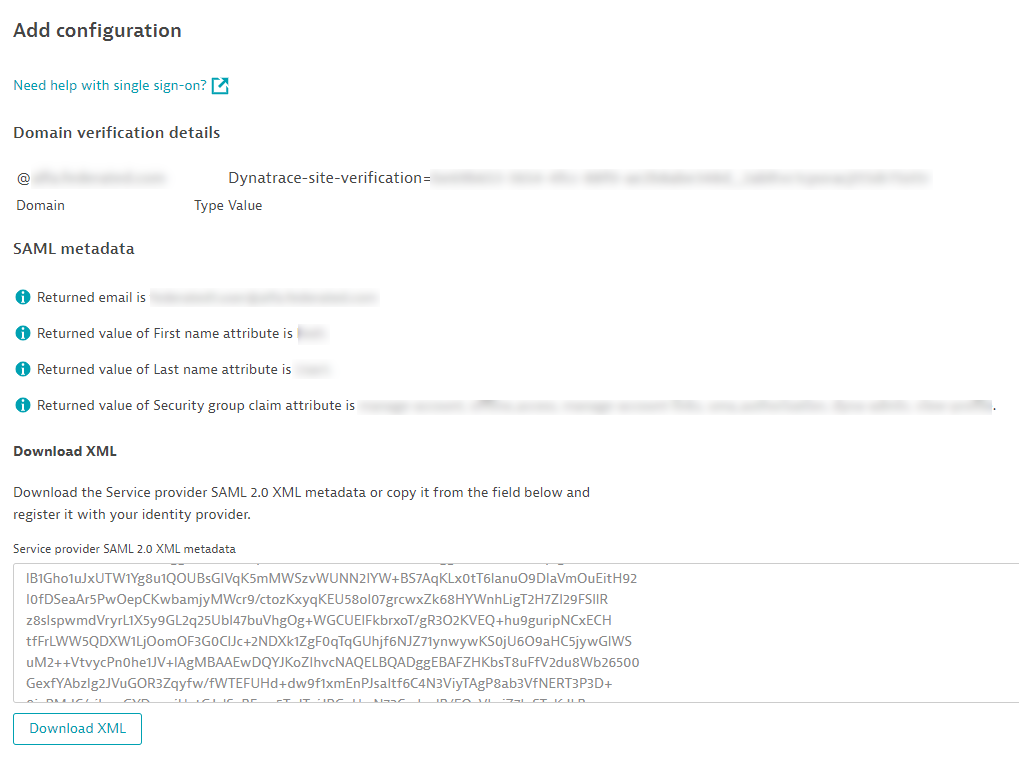
2. Verify your ownership of the domain
Before you can configure the domain for which you want to set up SAML, you need to prove ownership of the domain.
-
Select Account settings from the user menu on the right side of the menu bar.
-
Select Single sign-on from the navigation menu on the left side.
-
In the Verify domain section, enter the domain (for example,
@mycompanyname.com) for which you want to set up SAML. -
Select Copy and add the TXT resource record to your domain’s DNS configuration.
-
Select Verify so that DESK can verify that the record was added to your domain’s DNS.
It may take a few minutes for the record to be propagated in the DNS system and the value to become available for DESK to verify. -
After successful verification, the domain is listed in Verified domains.
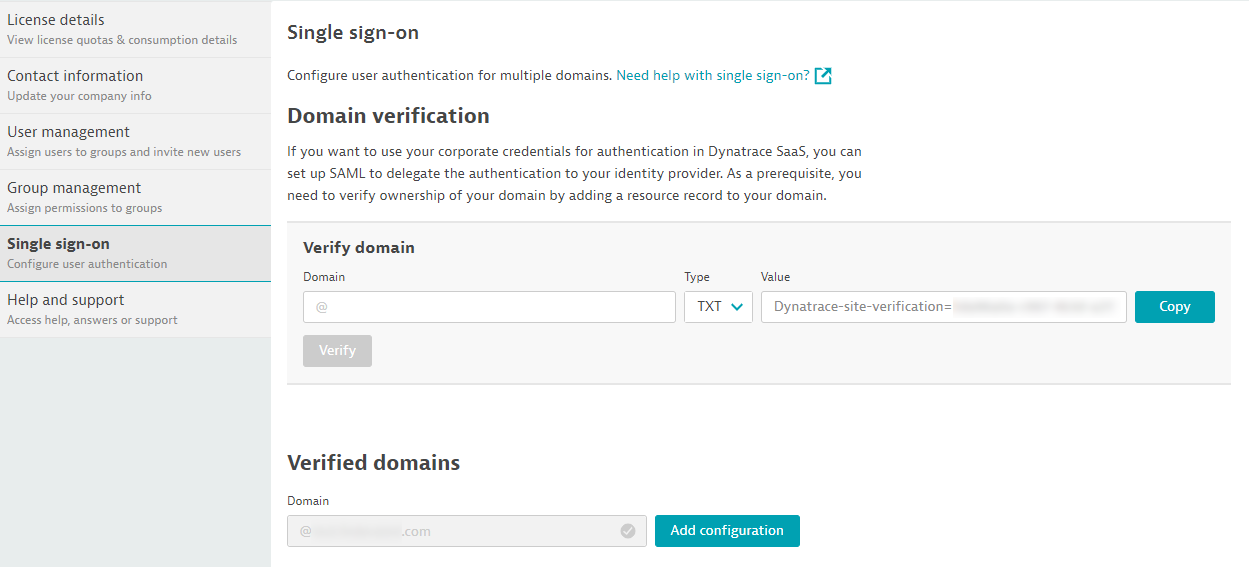
If people in your organization use more than one domain to sign in (for example,
@mycompanyname.comand@uk.mycompanyname.com), you can add additional domains using the same procedure: enter and verify the additional domains to add them to the Verified domains list.
3. Configure metadata
After you create a fallback user account and verify your ownership of the domain, you can configure metadata.
-
Select Add configuration to start configuring metadata.
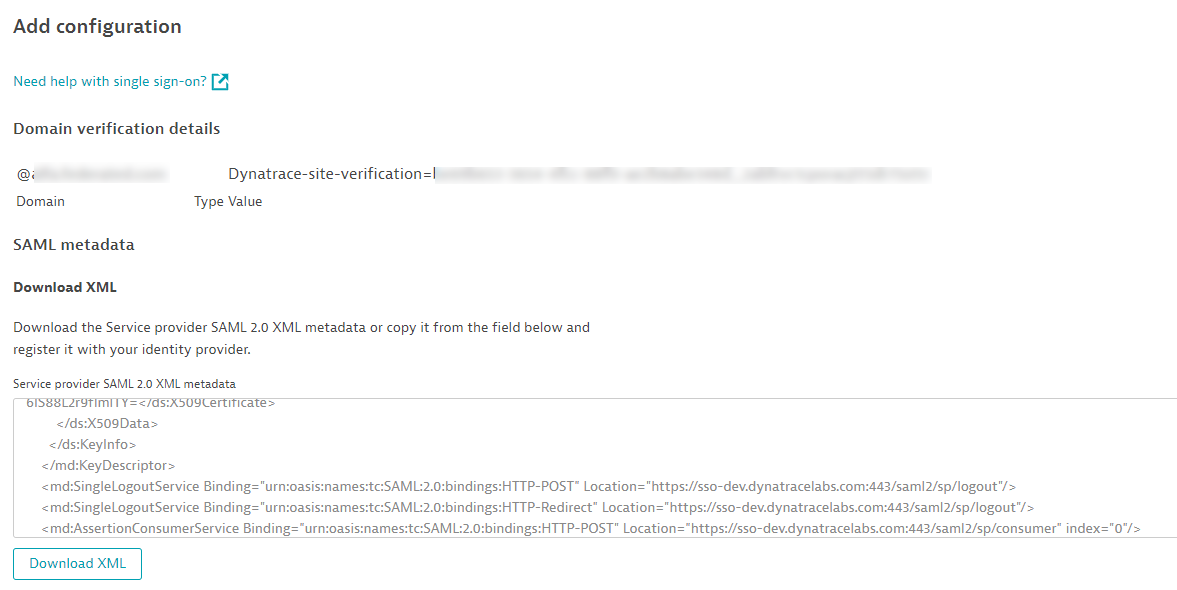
-
Select Download XML to download the service provider (SP) metadata displayed in the Service provider SAML 2.0 XML metadata.
- Alternative: if you prefer, you can select and copy the displayed data from this page instead of downloading a file.
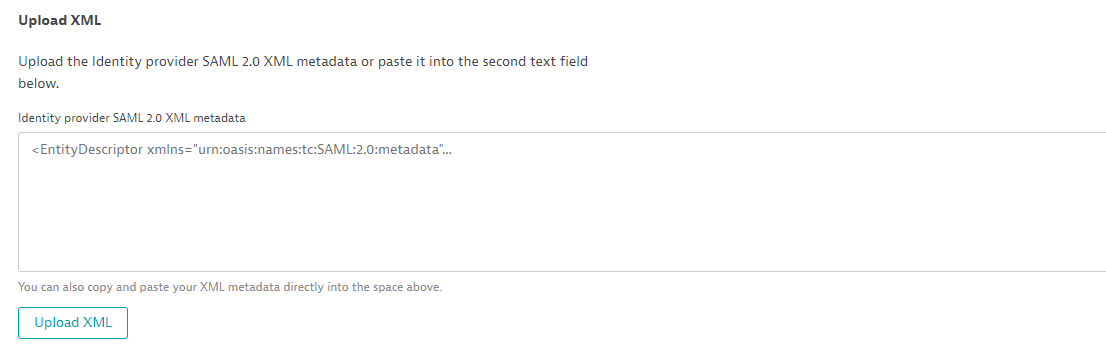
-
Register the data at your IdP and get the metadata of your IdP in XML format. The activities involved in this step depend upon your IdP's interface and requirements.
-
Select Upload XML to upload the file containing the metadata of your IdP in XML format.
- Alternative: if you prefer, you can paste the IdP metadata text directly into the Identity provider SAML 2.0 XML metadata box instead of uploading a file.
-
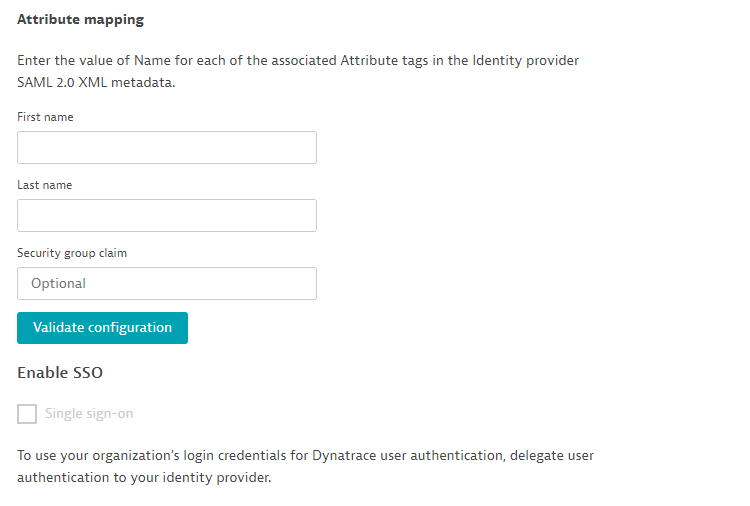
In the Attribute mapping section, specify the following:
- First name attribute is the attribute that contains the first name of a user.
For Microsoft Azure, it'shttp://schemas.xmlsoap.org/ws/2005/05/identity/claims/givenname - Last name attribute is the attribute that contains the last name.
For Microsoft Azure, it'shttp://schemas.xmlsoap.org/ws/2005/05/identity/claims/surname - Security group claim attribute contains the groups/roles of a user from your IdP. This field is needed if you want to use SAML authorization.
- First name attribute is the attribute that contains the first name of a user.
-
Select Validate configuration to verify your settings. You may need to sign in to your SSO.
If validation is successful, DESK will display a confirmation message:

Close that message to return to the Add configuration page and then select Continue to display a summary of the validated configuration.
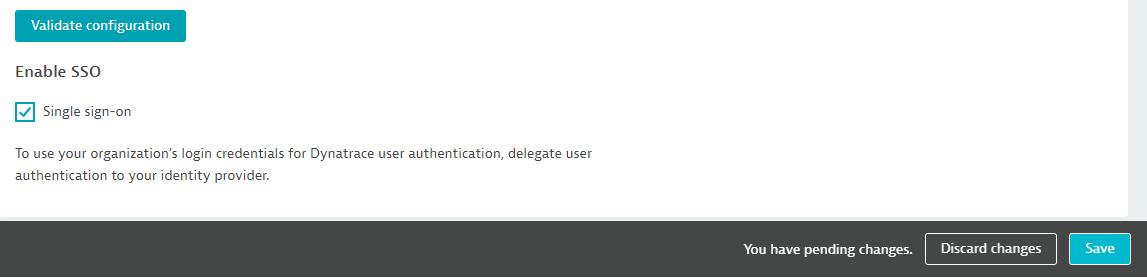
-
Select Single sign-on to enable your configuration.
Note: Don't sign out of DESK yet in case any SSO issues occur. -
Select Save to save your configuration.
4. Test your configuration
To test your configuration
- Open a new browser instance and a new incognito window.
- Navigate to sso.desk.com and type your email address at the sign-in page.
- Select Next.
You should be redirected to your company’s IdP. - Provide your domain password.
After successful authentication, you should be redirected to your DESK environment’s home page.
Troubleshooting:
- If you experience trouble, use the non-federated user (the fallback user account you created earlier) to sign in and change the configuration or disable federation.
- See Frequently asked questions below for answers to common questions.
SAML authorization
You can use SAML authorization to manage permissions in DESK. To do so, you need to map groups from your IdP to groups in DESK.
-
Select Group management and select a group.
- We strongly recommend that you create a new group first (select Create new group) to test whether SAML authorization works for that group.
- Make sure that you have a non-federated user with manage groups permission as discussed earlier.
-
When you specify a Security group claim name for a group and select Save
- All existing users from that group will be removed
- The group becomes a federated group. Assignment of users to that group is then controlled via the Security group claim attribute that you specified on the Single-sign on page.
-
Expand the Edit pane of a group to set up the mapping.
-
Specify a value in the field Security group claim name. This is the federated group name that is returned by your IdP and that this DESK group is mapped to.
- This typically isn't a group display name. It may be, for example, an LDAP ID.
SAML federated group mapping - example 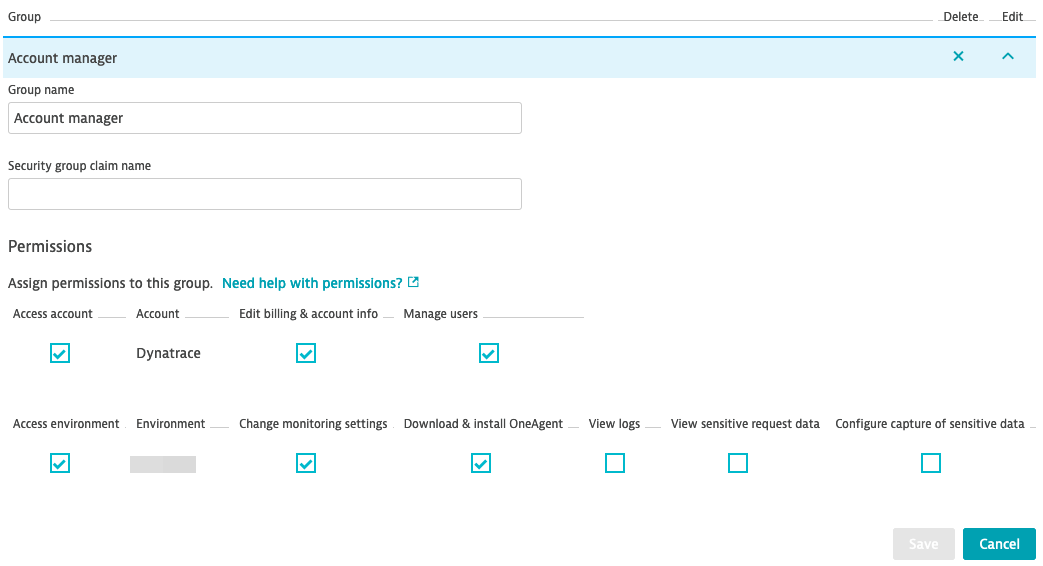
-
Select Save.
Note: Don't sign out of DESK yet. -
Open a new browser instance and a new incognito window and perform the sign-in.
-
Navigate to account settings (select Account settings in the user menu) and verify that you can still see the User management and Group management tabs on the left.
If you can't see them, you've lost your DESK admin permissions. Use the non-federated user account to change the configuration if you've run into any issues. -
DESK checks the value of the Security group claim attribute of each user following successful sign-in. If a matching DESK group is found, the user is added to the DESK group and inherits all permissions of that group.
Note:
- When using SAML authorization, it's not required that you invite users to DESK. If a user doesn't yet exist in DESK, but during sign-in one or more matching DESK groups are found (via the security group claim name), the user is created automatically.
- Upon each sign-in, the DESK group assignment is updated based on the values specified in the Security group claim attribute.
SAML IdP configuration
Follow the examples linked here to configure any of these SAML identity providers (IdPs) to work with DESK SSO.