How to define tags
To support tagging, DESK provides both a manual approach (Settings > Tags > Manually applied tags) and an automated, rule-based approach (Settings > Tags > Automatically applied tags).
Manual approach
DESK offers two ways to manually attach a tag to an entity. The first way is to select the respective option from the navigation menu:
- Go to Settings > Tags > Manually applied tags.
- Type in a tag in the text box.
- Click Add. Your tag will be alphabetically inserted in the list below.
- Select your newly created tag to manually apply it to the desired entities.
- From the listed entities eligible for tagging, select the entities you want to apply your tag to by clicking the respective tick box on the right. You can filter the entities appearing in the list by their type (e.g. service, process, etc.) or based on whether they are tagged. You can also use the search mechanism to search for a specific entity.
- When you are finished, click Done.
Automated approach
In dynamic or large environments, manual tagging can be impractical. In such cases, it’s recommended that you use automated, rule-based tagging. Automatically applied tags behave just like the manually-applied, except they’re applied automatically to new entities that match defined rules. Automatically applied tags can’t be removed manually from individual services, process groups, process group instances, applications, or hosts. Automatically applied tags are removed automatically once an entity no longer matches a defined rule.
Note: You can also set up automated tagging of the entities in your environment using:
- Smartscape and topology API,
- Environment variables,
- Host autotag configuration file (for hosts only).
How to define an automatically applied tag
To define an automatically applied tag:
-
Go to Settings > Tags > Automatically applied tags.
-
Click Create tag.
-
Type a name for the new tag in the Tag name field.
-
Click Add new rule.
-
Specify an Optional tag value. This value will appear next to the tag name after a
:and is used to provide more precise information. This value can be a property of the entity (e.g. a service, a process group etc.) where the tag is applied to. If the selected property is not available, the tag value will remain empty. -
From the first list box, choose the entity you want to apply the rule to (service, process group, host, and more).
-
Optionally restrict the rule to specific entities by setting the provided properties using the respective drop lists.
-
You can directly define a condition that the entity must meet before the tag is applied. If you want to define more conditions, click Add condition. Conditions check for specific values of any property that is available within the Conditions drop list on the left. A rule example for a tag named
ocp-projectis shown in the image below.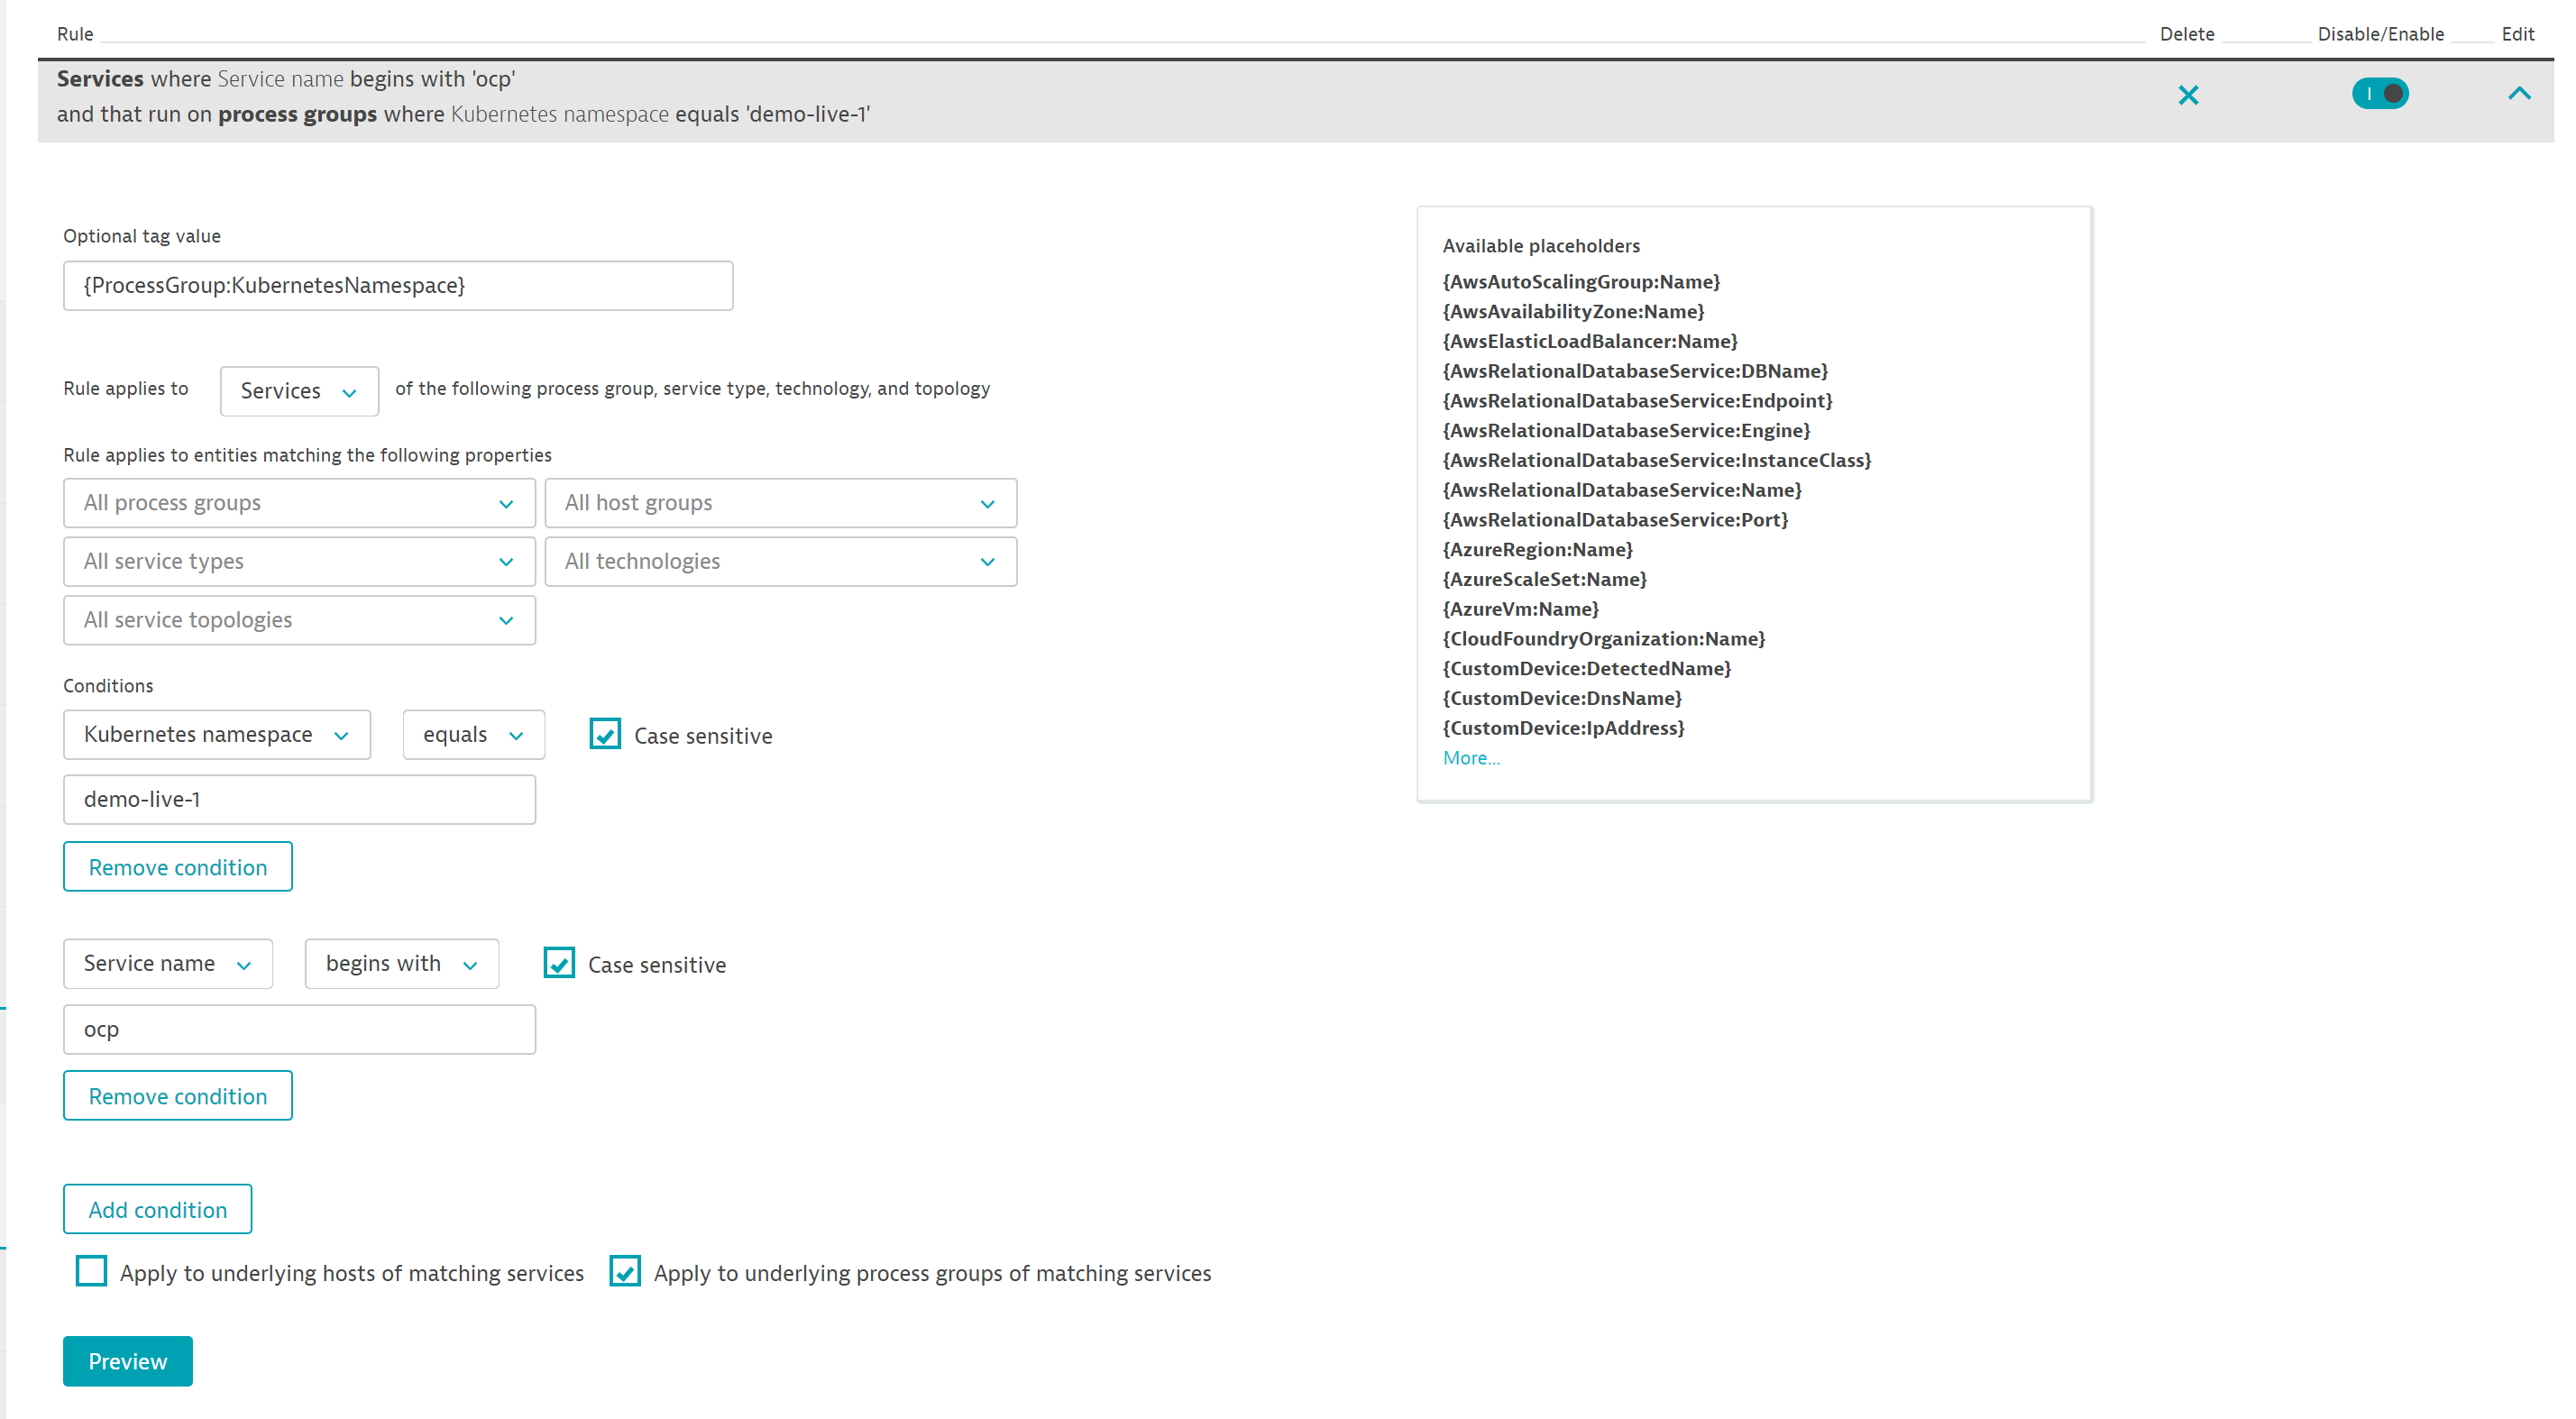
-
You can also propagate a rule to the underlying entities (i.e. process groups and hosts in case of services, or hosts in case of process groups) by selecting the corresponding check boxes at the bottom of the rule (see image above).
-
Click the Preview button to verify the results returned by the specific rule. Note that to be tagged, an entity must meet all the specified conditions of a rule.
-
Click Create rule. You can define multiple rules for each tag. Rules are executed in order. You can edit or delete a defined rule or activate/deactivate a rule at any time via the Disable/Enable switch.
-
To save your tag, click Save changes at the bottom right corner of the page.
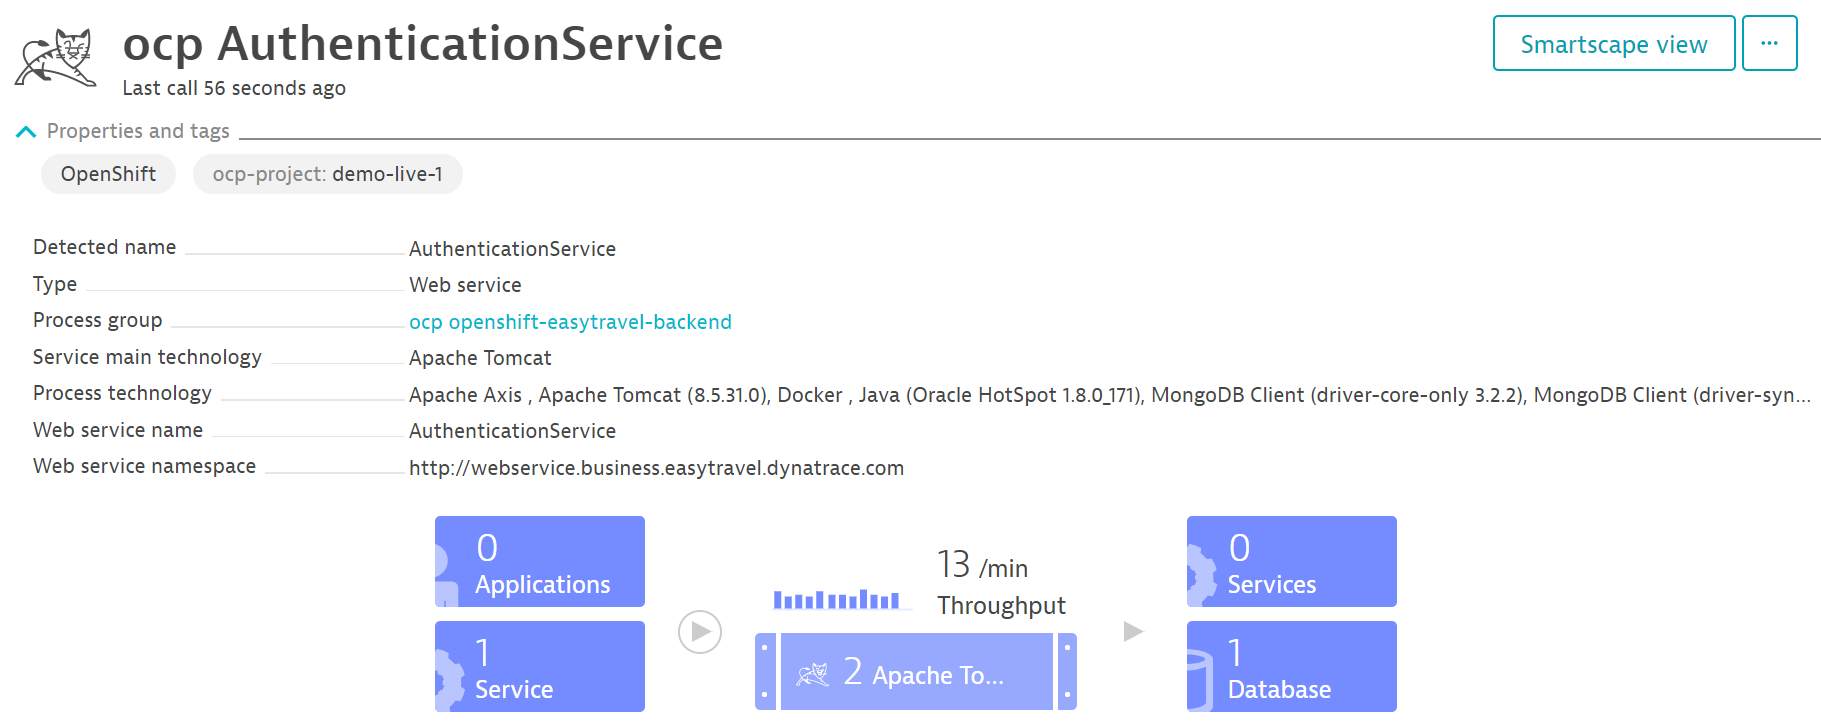
When you select a tag, you can see the rules currently defined for the tag as well as the entities that match all the defined rules in the Matching entities area. Automatically applied tags are applied to all existing and newly detected entities (i.e. services, process groups, etc.). Note that it can take up to a minute before your new tag is applied. Once a tag is applied to an entity, the tag is listed on that entity's page. For example, with services, each new tag is listed on the service's overview page within the Properties and tags section. The tag named ocp-project, for instance, that was defined in the example above, appears on the overview page of ocp AuthenticationService within Properties and tags extended with the tag value demo-live-1 (see image below).
Note:
Each tagging rule is self-contained and evaluated independently of any other existing rules.
Regular expressions
You can create conditions for your automatically applied tags based on regular expressions. In step 8 above, select the property you want from the Conditions drop list on the left. Then select contains regex from the next drop list and type the regular expression in the text field.
Note:
Automatically applied tags cannot be used in conditions for automated rule-based tagging.
Service and process group properties available for tagging
The service and process group properties available for tagging vary based on technology type.
To find out which properties a service provides:
- Select Transactions & services from the navigation menu.
- Select the service that you want to tag.
- Click Properties and tags to display the available properties.
To find out which properties a process group provides
- Select Hosts from the navigation menu.
- Select the host that includes the process group you want to tag.
- Click Properties and tags to display the available properties.
Properties supported by DESK for automated tagging
Rule examples for defining automatically applied tags
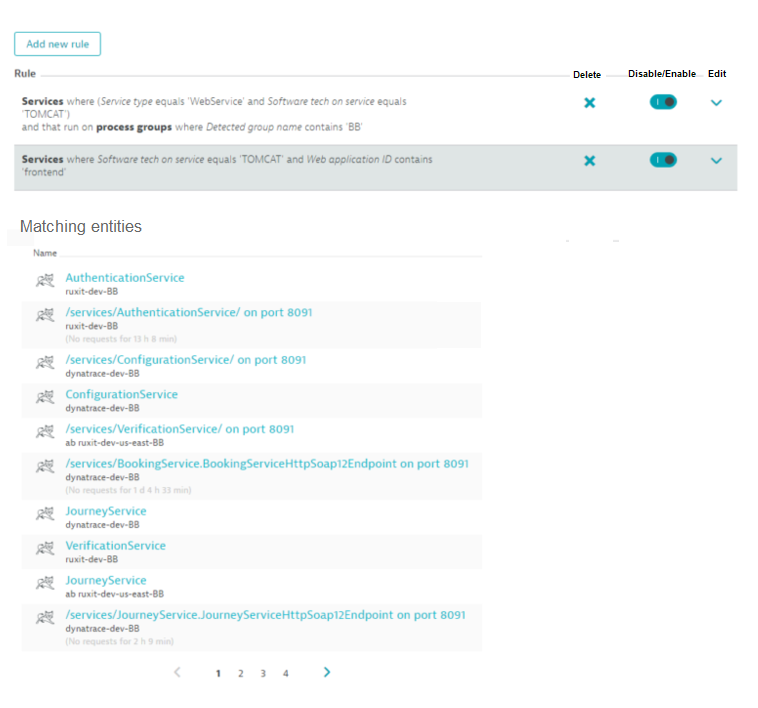
The image below shows two rules. The first rule filters services that are of type Web service, running on Tomcat, that include the string BB in their process group names. The second rule returns services that run on Tomcat and whose Web application ID contains the word frontend.
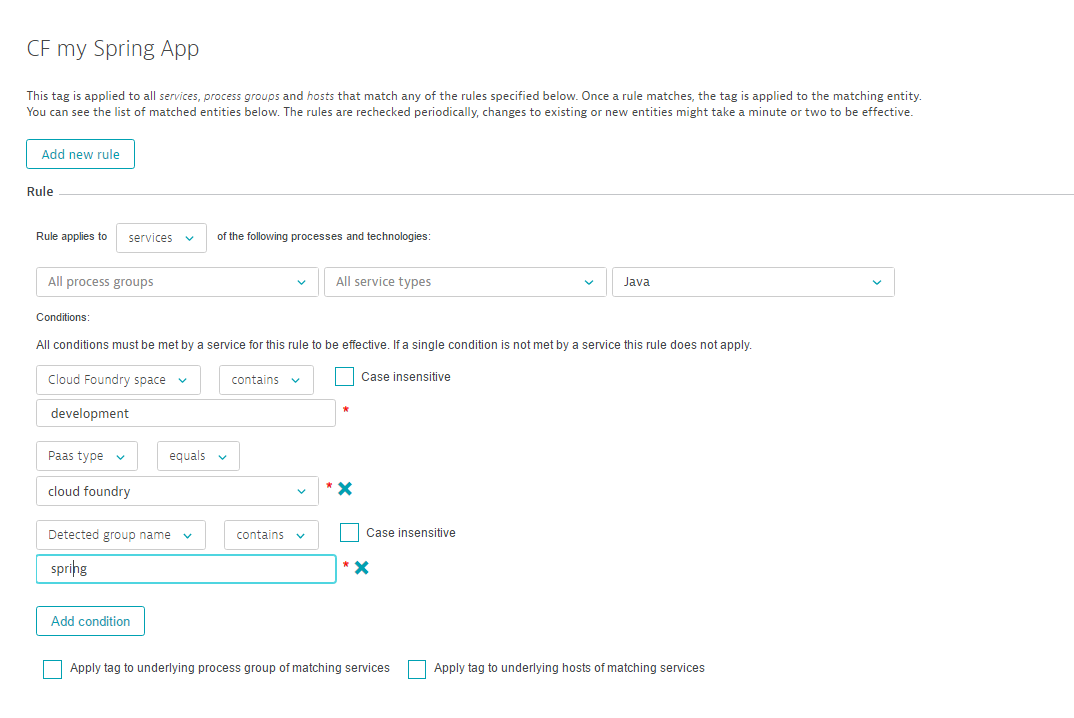
The rule example below matches all services that are built on Java-based service technologies, run in a Cloud Foundry space called development, have the PaaS setup type cloud foundry, and include the string spring within their detected process group name.
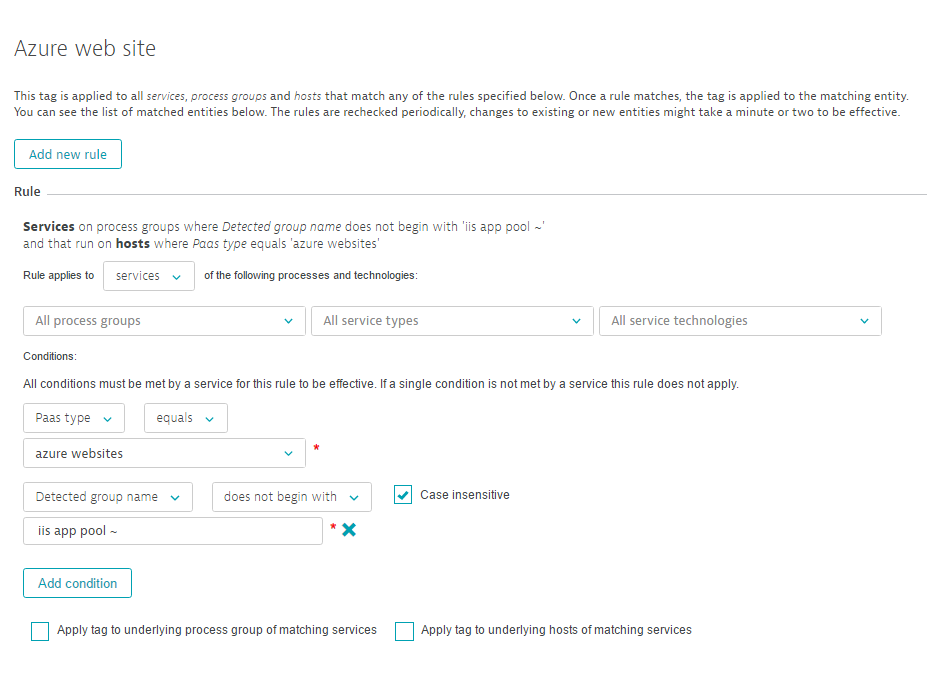
The example below shows a rule that applies a tag to all Azure websites services on process groups where the Detected group name does not begin with IIS app pool ~.
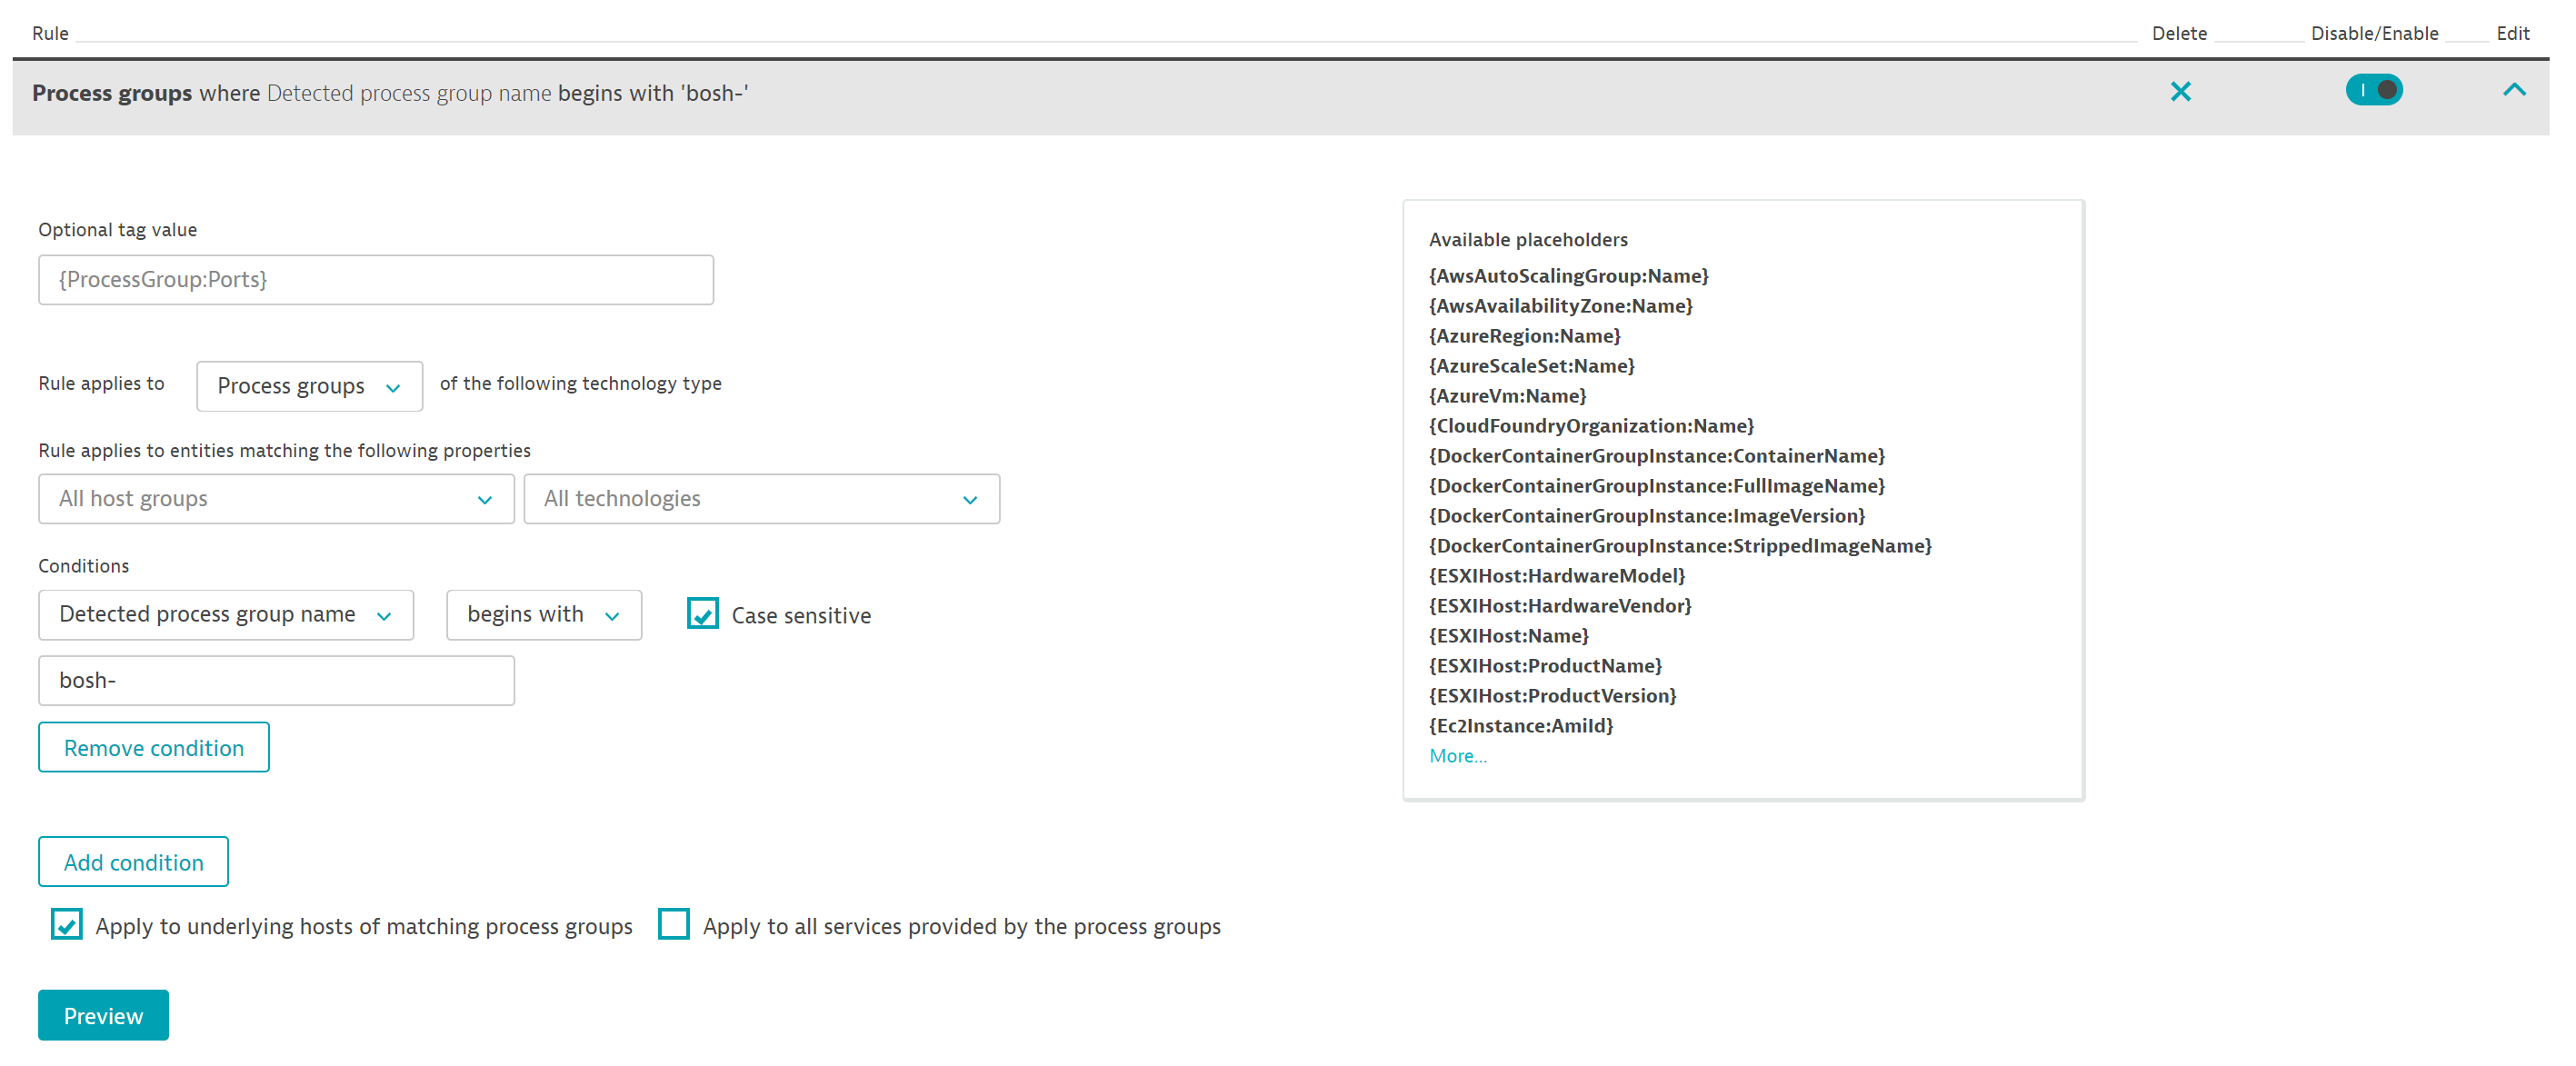
The image below shows a rule that tags specific process groups through the selection of the checkbox—thereby additionally applying the tag to the underlying hosts.
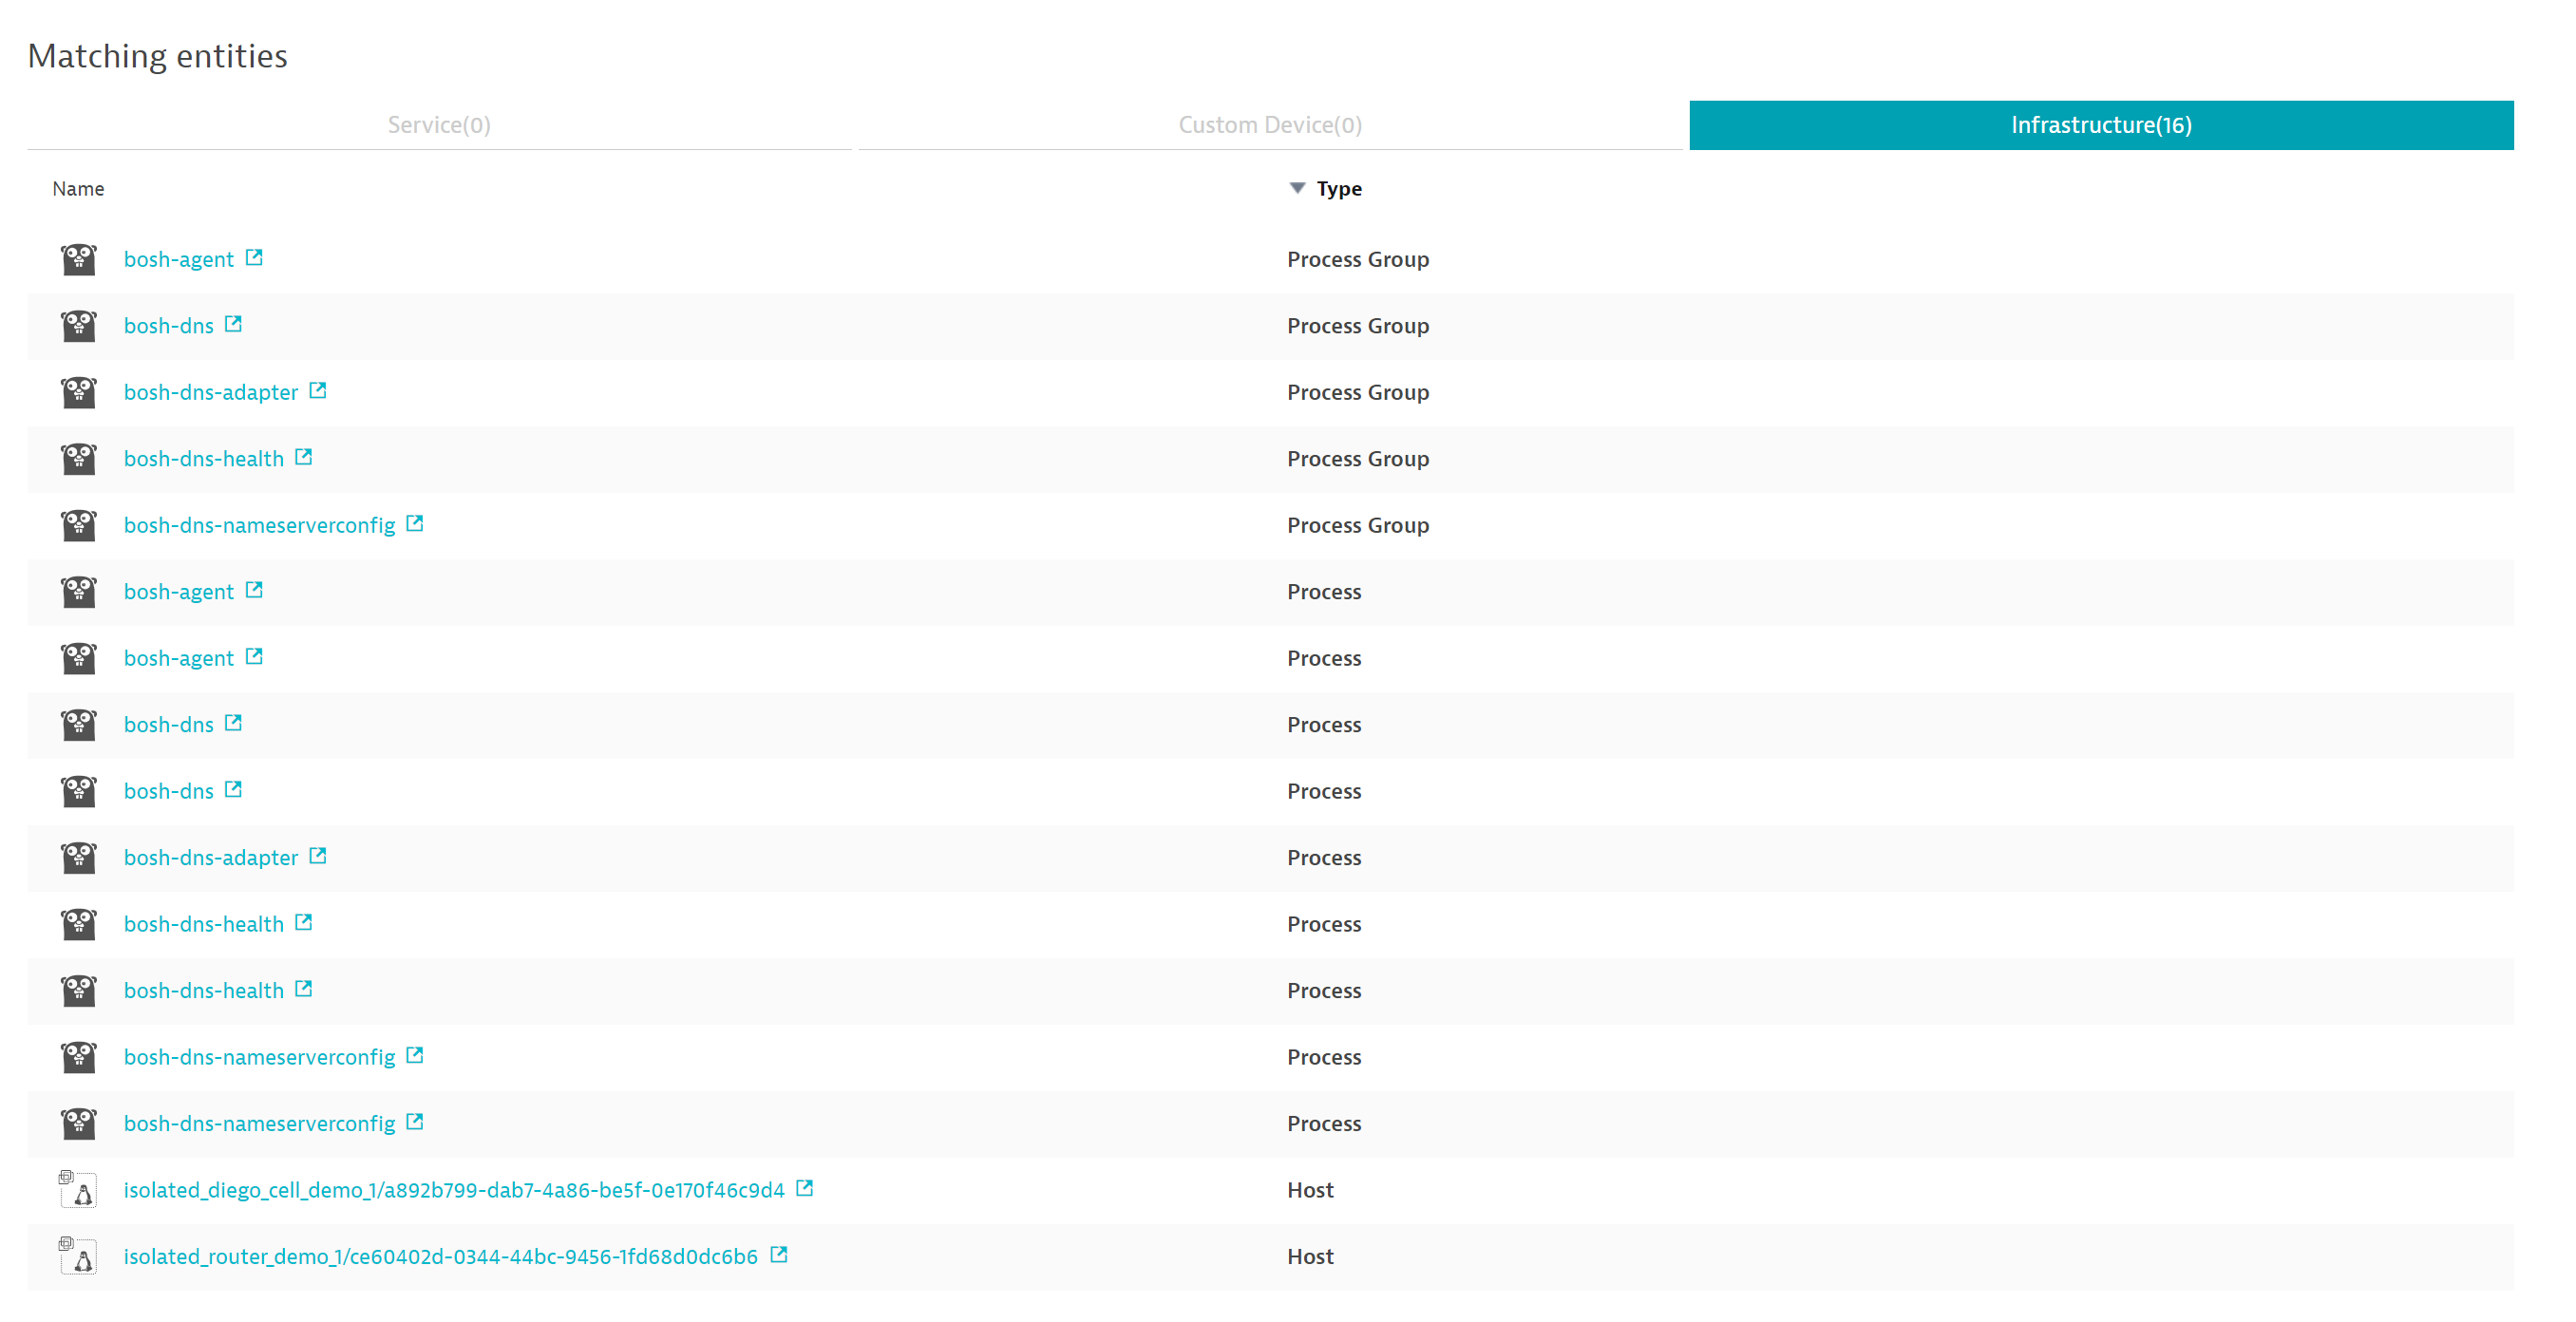
The Infrastructure tab includes the hosts to which the tag has been propagated (see image below).
Examples of how to use tags
Service, process group, and host tags can be leveraged in a number of ways. Two examples are detailed below.
Narrow down your analysis
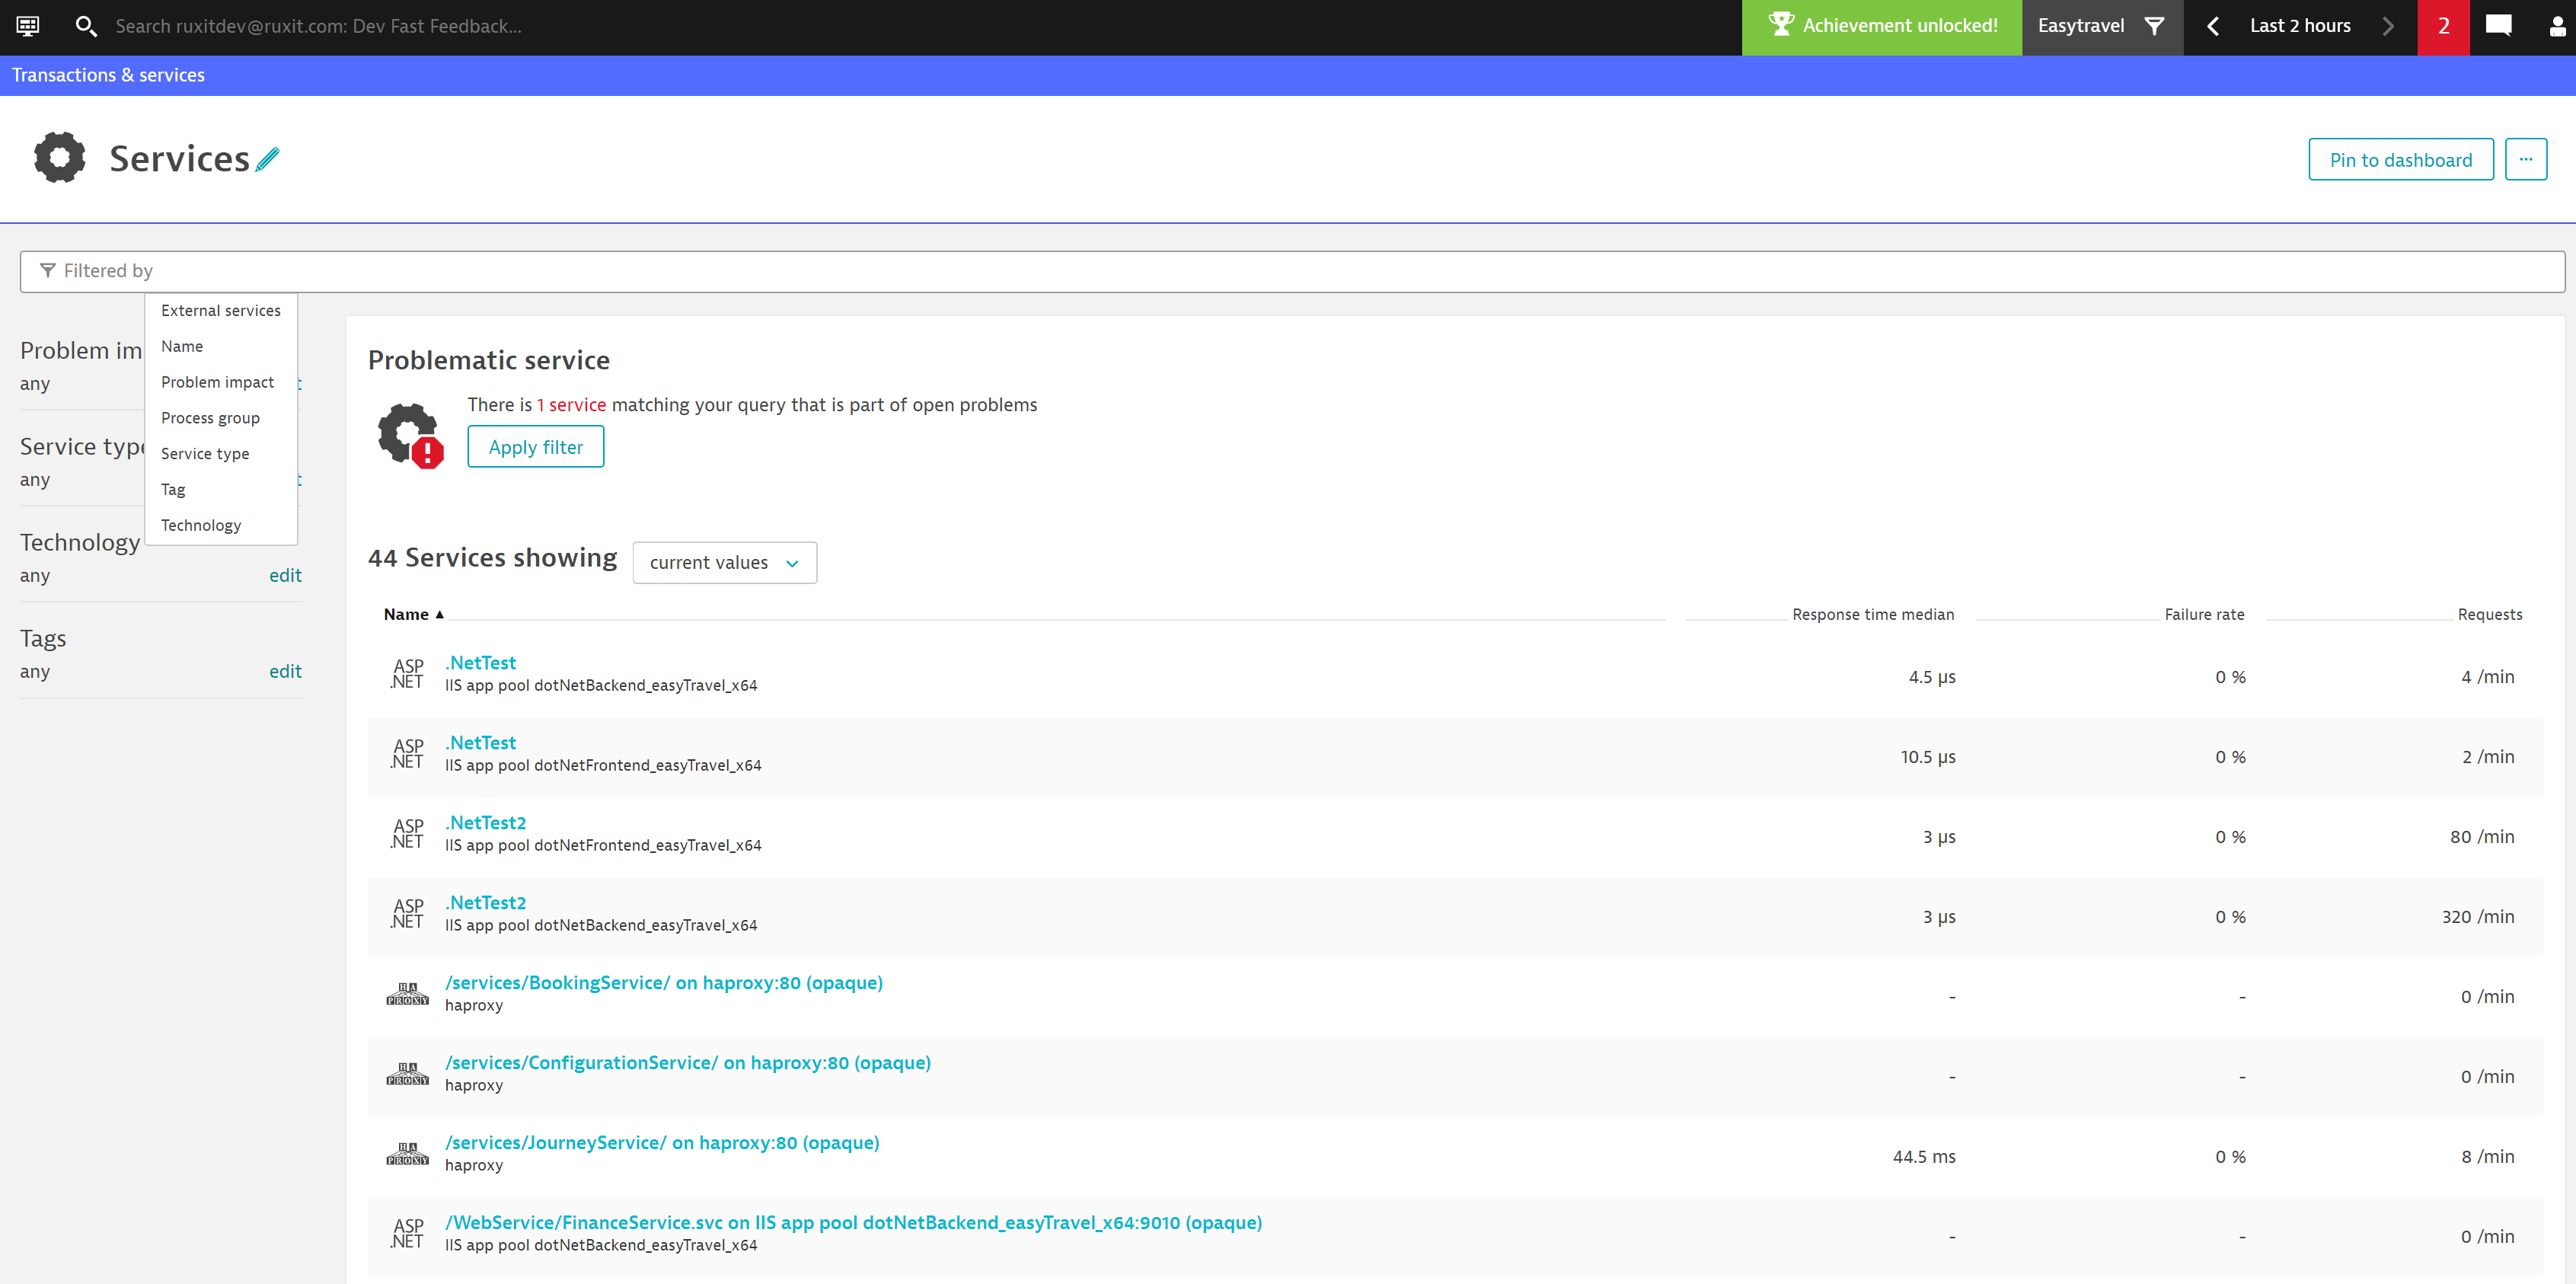
You can use tags to narrow the focus of your analysis to a specific set of services. Go to Transactions & services in the navigation menu. You can use tags as filters either by clicking in the Filter by text box, selecting Tag and typing in a tag name or by clicking Tags on the left menu and selecting one or more tags (see image below).
Once you've selected a tagged group of related services, it's easy to focus your analysis on those services. For example, you can click the Pin to dashboard button at the right top corner of the Services page and select the dashboard to which you would like to add a health monitoring tile for the specific group of services.
Ensure efficient routing of problem notifications
You can also use tags for efficient routing of problem notifications to responsible team members. Assuming that you have defined a tag, for example TeamBoston, to tag all entities that this team is in charge of, you can then use this tag to define an alerting profile. Subsequently, go to Settings > Integration > Problem notifications and click Set up notifications. Select the appropriate incident-management system or team-collaboration channel. Then select the alerting profile you defined from the Alerting profile list box at the bottom of the page. See the Slack integration example below.
Once set up, the next time a problem notification is sent out, DESK will check to see if any affected services carry properties that you've defined in your service tags. In this way, when critical parts of your environment are affected by a detected problem, the related notification will be delivered to the appropriate teams.
Notes:
- OneAgent version 1.111 or higher is required to generate the correct metadata for Cloud Foundry, OpenShift, and Azure Web Sites processes.
- Usage of the
DT_CLUSTER_IDenvironment ID leads to loss of some metadata within specific processes. This issue has been addressed in OneAgent version 113.